Improvement of suburban areas is not complete without the construction of a fence.
This design is not only a design need, which is designed to determine the boundaries of the territory and protect the site from prying eyes, but can also complement landscape design.
You can really decorate the site with the help of a wicker fence from a board, the design of which is quite simple, and the aesthetic qualities are high.
Advantages and disadvantages of wicker fence from boards

Classic wicker board fence
While in the private sector, you can observe various types of fences.
Along with the usual nets, decking and a wooden picket fence, you can increasingly find a wicker version.
Until recently, this design was mainly made of vine and was used as a decoration for a personal plot, however, over time, the technology began to be used for the construction of capital fences.
Perhaps the main distinguishing feature of a wicker wooden fence, in comparison with analogues, is a high aesthetics.
Such a fence is considered a manifestation of classicism and is perfect for a wealthy mansion and a small country house.
However, in addition to external qualities, the design has a number of other advantages:
With all its advantages, the braid, unfortunately, has one significant drawback: the service life of such a fence is not long and is about 8-10 years. It is worth noting that this period largely depends on climatic features and timely care.
Types of Braids
Wicker fences can be classified according to two criteria: the purpose (height) and the method of weaving. So, braids can be used for:
It is worth noting that the material used for the construction depends on the purpose. So, improvised reeds, cattails, and willows are more often used for decorations, while planed boards are used to erect capital fences.
By the method of weaving, vertical and horizontal fences are distinguished. At the same time, decorative fencing made of flexible materials by the hands of craftsmen can be supplemented with exclusive openwork elements or pigtails.
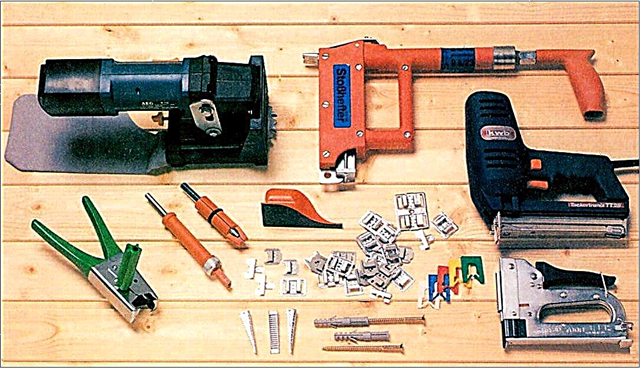
Necessary materials and tools
Before starting installation work to create a wicker fence, you should take care of the material and tools. The wizard will need:
The above list shows that all materials are absolutely accessible and do not require significant acquisition costs. Attraction of a specialized installation tool is not required.
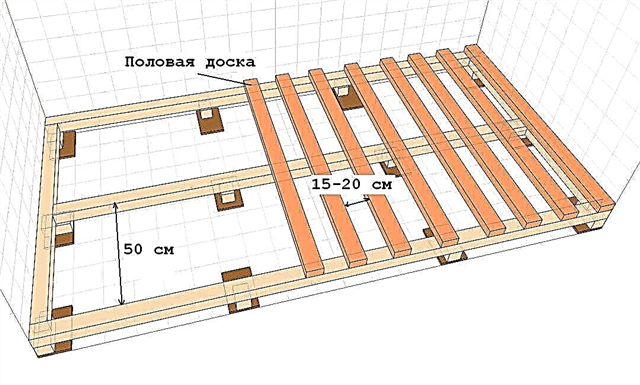
Start of installation work
Work on the construction of a wicker fence begins with a marking. To do this, it is necessary to determine the places of installation of the poles along the perimeter of the site, so that a flat line with equal intervals is obtained.
Horizontal weaving pattern
The “step” of the placement of the main pillars depends, first of all, on the length of the board (vertical version) and should take into account the presence of small tails near the extreme posts, however, the maximum distance should not be more than 3 meters.
So, a 6-meter board can be put entirely in a horizontal lash in the presence of 3 main pillars in increments of 2.5 meters, the middle of which will be the bend.
If the distance between the posts is exceeded during operation, an increased windage of the structure (loosening in the wind) will be observed.
Holes are made at marked locations. To do this, it is advisable to use a garden drill with a diameter of 25 centimeters, but in its absence a conventional bayonet shovel will do. Recommended hole depth is 0.8-1 meter.
It is worth noting that before installing the pillars should be prepared. To do this, wooden structures are coated with an antiseptic and painted in the desired color, and the metal poles are treated with a primer, after which they are also painted.
The prepared column is lowered into the hole, and its position is leveled with the help of a level, after which a third of the pit is covered with gravel. The final fixation of the pillar is to pour concrete.
After installing the pillars, you must make sure that they are all of equal height.
In order for the fence to look complete, and the earth, grass and moisture contained in the soil did not lead to premature decay of the lower boards, it is advisable to provide a kind of foundation. It can be a reinforced concrete structure or masonry of brick, stone.
Limiters
Regardless of whether the foundation was created under the braid or not and what type of weaving will be, the installation of a limiter is mandatory. This simple design will allow you to set the level of mounted boards and will not allow them to move down.
So, the limiter is a wooden block, in the case of columns of the corresponding material, or a metal corner when using columns from the profile. The structure is fixed at a height of 15 centimeters from the ground level (foundation).
If the fence is installed on the ground, it is advisable to lay the space formed before the limiter with a galvanized grid. Such a measure will prevent the appearance on the territory of the site of unsolicited dogs, cats.
Horizontal fence option
The installation of the vertical braid begins with the fastening of the vertical posts. Their number depends on the thickness of the main board, the step between the posts and the desire of the master. So, on a three-meter span 1 or 2 vertical bars can be installed, dividing the pitch between the main pillars into equal parts.
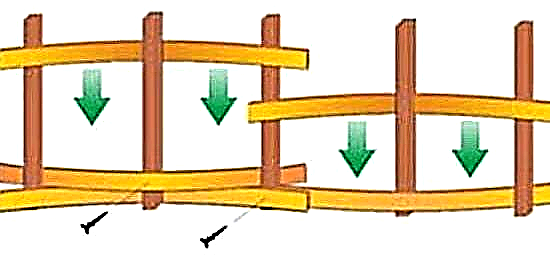
The technology for inserting horizontal lashes can be different:
The essence of weaving is that each board is staggered in relation to neighboring ones.
The uniqueness of a horizontal wicker fence is that its installation can do without the use of intermediate vertical slats. In this case, it is quite enough to install the main pillars at a distance of no more than 3 meters from each other (ideally with a step of 1.8-2 meters).
This technology allows the use of 6-meter boards, which allows to simplify the work and create a massive-looking fence structure.
It is worth noting that the whole structure is held only by tensioning the curved planks, without the use of nails or self-tapping screws, but being unsure of the result of their creation, these fixation tools are recommended.
Also, fasteners are mandatory for the topmost board, which may not be woven into the overall composition, but to decorate the tops of the pillars, covering them with oneself.
Vertical Fence

The creation of a vertical wicker fence from the board is based on the use of horizontal strips on which bending will be carried out.
Their number depends on the height of the fence, but, as a rule, two of these elements are enough.
An ordinary picket can act as planks, which is securely attached to the supports with self-tapping screws or nails.
The main material is threaded through the slats, enveloping them.
In this case, the overall pattern is achieved by alternating bending.
The vertical braid acquires its strength and stability due to the bending strength of the board and does not require the use of additional means of fixation.
A solid board can be beaten on top of the braid, which will give the whole structure a finished look, hiding the tails of wooden planks.
Finishing and Aftercare
Despite the fact that all preparatory measures to protect the material must be carried out before the installation process (treatment of wooden parts with antifungal agents, coating of metal structures with a primer, paint), finishing can be carried out after assembling the wicker fence.
It consists in applying additional protective equipment to the fence. It can be drying oil, varnish, deep penetrating impregnation.
When using them, it will be possible not only to reliably protect the wood from the effects of the external environment, but also to maintain the original appearance, emphasizing the naturalness of the wood. If old, previously used boards were used to create the fence, then their appearance will be able to correct the paint.
It is worth noting that the finish coatings are recommended to be applied in two layers, taking into account the fact that the second layer is applied to the thoroughly dried first.
As previously noted, the main disadvantage of the braid is its short service life. However, a caring owner can significantly affect the duration of operation by timely care and treatment of the wooden structure. To do this, you must:
Using simple protection methods, the service life of a wooden fence can reach two tens of years.
Garden Plaiting Braid
Owners of country houses should not forget that the braid can be worn not only to create a capital fence of the site, but also to decorate its internal elements. Moreover, to create such a lawn "highlight" there is no need to spend money at all, since an improvised vine or willow can be used to make it.
This bendable, pliable material will make it possible to create an improvised basket for flowers growing on a flowerbed or the basis of the composition “antique” in combination with clay pots and other utensils of our ancestors.
With a little imagination and diligence, each novice master will be able to create a home garden decoration with his own wicker fence from the boards, which will compete with the widespread concrete products of landscape gardening.
A few tips for a beginner
Of course, it’s difficult to take into account all the nuances for the first time and take care of the job perfectly, and despite the fact that you won’t be able to gain experience instantly, it’s useful to follow the advice of professionals:
Based on the foregoing, it becomes clear that the process of creating a wicker fence is not complicated and quite robust to the average amateur craftsman. Moreover, the result of creation always looks unique and expensive.
How to install a fence from the boards - on the video:
Have you noticed a mistake? Select it and press Ctrl + Enterto let us know.
Advantages and disadvantages of wattle
Houses surrounded by light, but at the same time stable and reliable structures made of twigs, can be seen not only in old films and illustrations for fairy tales, but also on the usual six hundredths. Many owners of private houses and cottages decide to install a wicker fence around their land - unusual and beautiful. It is especially nice that you can make it yourself.
Thinking about how to make a wicker fence with your own hands, you need to understand what advantages and disadvantages such structures have in comparison with fences made of traditional materials. Clear advantages include:
- environmental Safety,
- simple execution
- attractive look
- relative cheapness.

The attractiveness of wicker hedges does not exclude possible disadvantages. There are few of them, but you need to know about them. It is difficult to repair such products. Any damage destroys the decorative fence. In the event of failure of even one element of the composition, it will be necessary to disassemble, repair and fix the whole section. Unlike capital fences, elegant wicker structures quickly collapse under the influence of precipitation and wind.
This video shows how to make a wicker fence:
Material and Tools
Usually the fence is woven from branches. To create a wicker fence created by your own hands becomes the pride of the owner of the site, you need to choose the right material. Weave an elegant, but strong fence can be made of branches of different trees, shrubs and plants:
- And you. Willow twigs are the most popular raw material for weaving fences. Harvested from September to March. Durable hedges are made from properly prepared flexible branches. There are 2 types of enclosing structures made of willow: “living” and “inanimate”. When “live”, young shoots of willow are planted in the soil at a distance of 0.3 m from each other. They take root and begin to grow. The branches of plants intertwine, wattle forms. A hedge is trimmed twice during the season, giving the desired shape. In the "inanimate" form, cut branches are used.
- Hazel. Young shoots are cut off in early spring before the appearance of kidneys on the hazel.
 Hazel has quite smooth and flexible branches, they are well suited for wicker fence
 Branches of berry or fruit trees should be cleaned and leveled before weaving
Shoots are cut in the forest, garden or bought in nurseries. Young branches are cut with a sharp knife or secateurs, making a cut at a right angle. Their diameter should be slightly more than 20 mm, then a beautiful tight weave will be obtained. The bark of the shoots is cleaned with a sharp knife. The peeled branches can be painted in a different color. A saturated solution of potassium permanganate will make them dark brown, hydrogen peroxide - white, and copper sulfate - gray.
Sometimes a wicker fence is made of boards, MDF panels, peeled veneers. Such fences are reliable, look original, but it is difficult to repair them.
Modern technology has stepped far forward. Having preserved the grandfather's method of weaving, apply new materials. Today, wicker fences are often made of PVC rods. Polyvinyl chloride structures are durable: artificial “branches” are impregnated with protective solutions, coated with a primer. They are painted with a paint that retains color for a long time, resistant to temperature changes, air humidity and precipitation. In the store you can choose PVC of any color. Wicker hedges made of artificial rods are easy to install. They are easy to care for: sometimes you need to wipe with a solution for PVC, and metal supports are covered with an anti-corrosion primer.
In order to create a wicker fence of branches with your own hands, in addition to wood raw materials or PVC, you need supports (metal pipes or a wooden bar) and a wire with which to mount the stiffeners of the paintings. You will also need tools:
- secateurs, knife,
- awl,
- screwdriver or screwdriver with screws,
- hammer,
- manual or gas drill.
All necessary tools are prepared in advance so that they are at hand at the right time.
Weaving technology
If you study the recommendations of specialists, show imagination and minimal design skills, you can independently weave the original fence. There is an instruction that explains how to make a fence from the vine with your own hands. Following her instructions, creating a beautiful and durable fence is not difficult.
 Following the instructions for weaving the fence, you can get a quality design in the end
First, markup is applied and supports made of metal poles are installed (less often use a wooden beam, because it is less durable). The support will make the structure strong and stable. To install a high fence, the posts are placed about 1 m apart, buried in the ground by a third and poured with cement mortar.
Between the supporting posts, a thick (up to 3 cm) vine is dug to a depth of 20 cm to create a hedge canvas. The rods should be approximately 50 cm higher than the structure under construction (at the end of the work, the top edge is leveled).
To protect the bottom of the fence from rotting, it is installed above the ground by 20-25 cm. The bottom edge is reinforced with wire, attaching it to the supports. The first cross bar is attached to the posts with self-tapping screws.
Web weaving. There are different weaving techniques. How to weave wattle from rods, decide the owners of the site. Often the rods are staggered. The vine is passed through vertically dug branches. The ends of the branches are pulled in and secured. Every five rows a wire is woven into the structure to give it rigidity.
After completing 3-4 rows, lightly knock on top of them with a hammer to seal. To create an air openwork fence, one shoot is gradually introduced into the canvas. If you immediately weave several shoots (in one bundle), you will get a stronger structure.
The staggered arrangement of the branches may seem primitive. Then you should try other options: arrange the shoots diagonally or with a pigtail. There are many ways to weave. To choose the right one for yourself, you just need to “play” with the rods, trying to place them in different ways to form a beautiful and reliable canvas.
Branches should not go beyond the borders of the wattle fence. Therefore, they are cut to the desired length and attached to the supports using screws and wire. The upper edge is aligned in height, cutting the protruding ends. If the vine is flexible, the ends are bent and carefully inserted into the canvas.
By sequentially following all the instructions, you can create not only the fence of the territory, but also a cozy home atmosphere on your site. Openwork environments for flowerbeds and flowerpots, elements of outbuildings are woven according to the same principle.
Service life extension
The wicker fence is tender and admirable, but its service life is short. In order to preserve the beauty of wattle for a longer time, the shoots from which it is created are impregnated with antiseptic compounds for wooden coatings and covered with stain. To do this, use a spray gun, evenly spraying paint on both sides of the fence. After the hedge dries, it is varnished. After 2-3 years, it is recommended to update the painting of the fence.
A good master puts his soul into any man-made creation. Each twig woven into the canvas of the hedge remembers the warmth of human hands. Various weaving techniques turn an ordinary fence into a work of art. The decorativeness of wicker fences often prevails over their protective function, but it brings incomparable romance to the design of the estate space.
Advantages and disadvantages of wattle
First, we list the main advantages of wicker fence:
- The original appearance.
- Environmentally friendly fencing.
- Wicker fence does not require a foundation.
- Ability to install anywhere.
- Simplicity and ease of installation.
- Materials for making wattle are usually not purchased, but are free.
- You can build a wicker fence with your own hands without involving craftsmen for this purpose.
- Such a fence is capable of passing air to the site.
- The fence can be given any shape, sometimes very original.
- You can make a fence of any desired height.
- Wicker fences are not durable. They can be damaged mechanically.
- The supports, buried in the soil, are in constant moisture, as a result of which they can rot after a few years. This disadvantage can be avoided if the lower parts of the supports are treated with special impregnations, and then coated with a protective compound.
- Through such a fence you can see what is currently happening inside the site.
- The fence of the branches is prone to fire.
Materials for making wattle
Do-it-yourself wicker fence can be woven from a variety of materials that are flexible, durable, easy to handle, and weather resistant. Most commonly used:
- Vine. She bends perfectly, withstands severe frosts.
- Willow. The rods of this plant are unusually flexible, durable and supple. They are characterized by smoothness and high durability. Fences of almost any height are made of willow rods. To do this, the rods are cut and then dried. Use completely dried shoots of the plant. Harvesting is done in the fall, when the trees dump foliage.
- Willow. Wicker willow hedge is built very quickly, as the willow branches are very smooth, are durable and easy to install.
- Hazel. Only young shoots of the plant are used, which are harvested in early spring, before the awakening of the buds. Hazel fence can be made using branches of various thicknesses.
- Branches of various trees collected after spring pruning. It can be cherry, mulberry, birch, nut, cherry, apple tree, pear. It is better to use shoots aged 1-2 years, which are easy to weave. Well-known for the production of hedges are the so-called fattening shoots, which are usually removed from trees by gardeners.
From a flexible willow vine
This is a classic version - just such a fence was used in ancient times. Here's how to make it:
- Racks - branches or trunks with a diameter of about 4 cm are dug into the ground at a distance of 30 - 50 cm from each other. It is good if it is possible to use pine wood for this. The immersion depth is equal to half the height of the fence, but not less than 0.5 m. The buried part must be burnt, and then wrapped with roofing material or coated with bitumen (it is possible with tar). To prevent the racks from “walking” during weaving, the tops must be fastened with strong, even poles.
- The vine, if it has been dried, is softened by immersion for several hours in hot water. Only the ends can be lowered into the water, but then the flexibility will return only after 1 - 2 weeks. The fastest way is steaming.
Now you need to remove the bark from the rods. This can be done quickly using the so-called. shchemilki - forks with two converging teeth having a sharp edge on the inside. The rod is wound between the teeth as far as its diameter allows, and then it is pulled through the squeegee. In this case, the bark is removed from it by the sharp edges of the tool.

Willow weave
A similarity to a squeegee can be made independently by splitting a sufficiently strong branch and tying it tighter right after the split section.
Having chosen the vine thicker, it is woven between the uprights, thus starting the bottom row. It should not lie on the ground itself, otherwise it will quickly decay. The optimum height is 10 - 15 cm. Having rounded several racks, continue the row with a new vine, laying its edge on the penultimate rack. Thus, the rods in a row are stacked with an overlap in one span and here they need to be fastened with a wire or tape.
If flexibility allows, you can make a row of a bunch of rods. Compared with single weaving, the fence will turn out to be more massive, and its surface will become embossed.
The ends of the lower row must be fixed on racks with wire or screws.
It is very useful to reinforce the bottom row with a wire that is woven between the posts like a vine. Then it can be woven every 7 to 8 rows - then the canvas will be more durable.

Above the first, the second and subsequent rows are interwoven in the same way, only the direction of weaving is alternated: adjacent rows should bypass the racks from different sides. Having collected 3 to 4 rows, the braid is compacted with blows of a mallet in the upper row.
The ends of the rows should be trimmed evenly or inserted on the inside and screwed with wire or screws to the posts.
From a polymer vine
Noticing the growing interest in the old wicker fence, many companies set about manufacturing hollow polymer rods. Their diameter is 18 mm, the material is high-strength polyethylene. On the surface, a relief is formed that imitates the bark of a natural vine, so that the polymer analog is very similar to it. But it does not rot and easily tolerates the most difficult weather conditions, and therefore it serves much longer - about 20 years.
Various options are available both in length - 3, 4 and 6 m, and in color: white, light and dark gray, brown and ashy. Green rods can be made by special order, but their cost will be approximately 10% higher.

Wicker Fence and Wicket
Finished sections of wattle of various heights, as well as gates and gates, are also available. The frame of such elements is made of a metal profile painted with especially resistant powder paint. A fence made of polymer vines is installed in the following order:
- In the soil to a depth of 200 mm, a strip foundation is poured.
- Metal racks equipped with a thrust bearing are screwed to the foundation with dowels.
- On racks with the help of special fastenings sections, a gate and a gate are fixed.
The modern factory wattle fence looks much more presentable than its natural prototype, so it is suitable even for fencing a household with an expensive mansion.
A croaker is a rounded lateral part of a tree trunk. A slab fence is a cheap option for a wooden fence.
You can read all about the pros and cons of installing stone fences in this material.
From birch branches of vertical weaving
The birch branches used must be large enough - with a diameter of 3-5 cm. Their length is equal to the height of the fence, and this parameter cannot be less than 1.7 m. Work should only be done with freshly cut material as the most flexible.
The sequence of actions is as follows:
- We begin, as usual, with the installation of racks. In this version of the wattle fence, they are more powerful - they are made of logs with a diameter of 10 cm or a beam of approximately the same section. We install the racks in increments of 3 m, the depth of immersion in the ground is from 0.5 m. With a high fence height, the racks do not have to be deepened very much - they can be concreted. Do not forget about the waterproofing of the buried part.
- To the posts we fix horizontally with boards with a cross section of 46x25 mm with screws. With a fence height of 1.7 m, three such cross-bars are required - above, below and in the middle, that is, the step between them is about 85 cm.
- It remains to weave birch poles between the cross members, moving them from top to bottom. In this case, the direction of bending, as in ordinary willow wattle, alternates. Having established a new branch in place, it needs to be knocked down to the previous hammer, compacting the wicker.

Fence option using branches
From the boards
Another high strength version of wattle. The canvas is formed by a board with a section of 150x20 mm, located horizontally. The length of the boards is 2.1 m.
The fence is built like this:
- We dig up racks in the ground with a step of 2 m. As in the birch fence, they must be strong enough - we use a bar with a section of 100x100 mm.
- In the intervals between the uprights at equal distance from them, vertical bars of a smaller section are installed.
- We start weaving from below, leading the board so that it rests on the racks on one side with its edges, and bypasses the intermediate beam on the other with the middle. With the help of a hammer, we bring the board to a strictly horizontal position (controlled by level), after which we fasten it with screws to the posts.
- A second board is mounted a little higher, bypassing the racks and the intermediate beam on the other side. Behind it is the third and further, until the entire span is laid to the top.
Similarly, we sew up the second and subsequent spans, so that the boards in them are on the same level, but are located on opposite sides of the racks.

Wicker elements on a personal plot create an atmosphere of comfort
Advantages and disadvantages of wicker fence
Wicker fencing has its pros and cons, main advantages four:
- Beautiful appearance. Weaving allows you to make the fence a real work of art. High and low fences with different types of weaving can be a great addition to the design of the site.
- Environmental friendliness. Wicker fence made of wood is environmentally friendly. When creating such fences, substances hazardous to humans are not used.
- Low cost. If you make a fence yourself from a tree from your own plot, then you can do without waste. But if you purchase ready-made fences, the price will depend on the material, the height of the product and the types of weaving.
- Simplicity of construction. You can decorate the site with wicker on your own, without resorting to the help of special companies.
Despite the low cost, beauty and environmental friendliness, the wicker fence has significant flaws:
- Lifetime. The fence does not last long; it is exposed to wind, rain and snow.
- Not a capital building. If you decide to build a wicker fence on the site, you should know that it will perform only a decorative function, it will not protect against the appearance of uninvited guests.
- Complicated repair. If at least one element is broken in the fence, you will have to disassemble the entire structure or section. The complexity of the repair is a feature of all wickerwork.
Types of Wicker Fences
Fences differ in height, weaving method and appearance.
Braided fences in height can be of three types:
- High hedges (not lower than 2 meters) can become reliable protection of the site. Such a fence will be a capital building if the pillars are made of stone, and a wicker fence is installed between them.
- Low fences, the height does not exceed 50-70 cm, designed to decorate flower beds, are used as an element of landscape design.
- Wicker fences about 1 meter high set for zoning plot. For example, to separate a recreation area with a swing, a table and benches from the rest of the territory.
By the method of weaving, hedges are divided into:
- Horizontal - the most common and simple to execute. Such fences are more durable than vertical ones.
- Vertical It is difficult to do wickerwork on your own without experience in weaving, but the craftsmen create real works of art, decorating the fence with complex patterns.
Wicker fences are distinguished by the method of creation and use:
- Wicker hedges with a height of less than 0.7 m are already attached to the finished base, professionals use metal to increase the life of the unit.
- Flat wattle fence is installed in sections, one length is about 2 meters. This type of weaving is easier to repair, and if necessary, one of the parts can be completely replaced.
- Rounded decorative wickerwork is more often used for flower beds and flower beds as a decoration.
What is wattle made of? Wicker fences can be made from virtually any flexible material. The most short-lived - cattail and reeds.
The maximum service life is 4 years, then they dry out and quickly collapse. Much more often, wicker and willow are used to create wicker; in recent years, fences from boards, which have not only beautiful appearance, but also a high degree of reliability, have been especially popular. Companies that make wicker fences can offer PVC products, albeit not a natural material, but strong and durable.
And in this article it is told about metal stoves for a bath.
Willow Wicker Fences
 Willow branches are flexible, pliable and durable, of which weave carts, baskets and, of course, fences. Before starting work, the material must be prepared. Steam the rods to make them flexible.
Weaving fences from willow can be vertical or horizontal. The second option is especially interesting. First, horizontal supports are made, then willow branches are vertically installed, digging the ends into the ground. After a while, the willow will turn green, it will seem that nature itself created the wattle fence.
Wicker fences made of twigs
Vine - flexible and long branches of trees and shrubs that are used to create fences and even the construction of residential premises. Wicker wattle is popular due to its aesthetics, naturalness and beauty.
To make the fence reliable and last longer, it is important to comply with several requirements:
- To give flexibility and ease of work with the material, the rods are soaked in hot water or left for a while in a steam bath. After that, you need to immediately begin weaving, and when the vine dries, it will become strong and will ideally hold its shape.
- The size of the rods also matters. For a small decorative fence, it is better to choose branches no thicker than 2 cm, for high wooden wicker fences - from 2 to 3 cm.
- From the vine before starting work, you need to remove the bark, treat the branches with antiseptic agents, a solution of iron sulfate, varnish, stain, potassium permanganate.
Wicker fence from the boards
Wicker fence from the boards can perform not only decorative, but also protective functions. It is reliable and is able to protect against unauthorized persons from entering the site.
For the manufacture of used planed boards and poles (metal, wood or concrete). The structure is held by tension of wicker boards, but screws and nails can be used to strengthen.
After construction, usually a small gap remains below, it is laid with brick or stone.
Especially popular wicker elements from boards in a brick fenceperforming a decorative function. If you decide to independently build a wicker fence from boards, then get ready for difficulties and be sure to find an assistant, it is extremely difficult to build such a structure alone.
PVC wicker fence
Usually a wicker fence is associated with wood and natural material, but in recent years it has also been made of PVC, having a number of advantages:
- Durability. This is the main difference between PVC and vines, boards and willows. PVC has a protective coating, modern color and primer, this allows you to operate the fence for several decades. During this time, the design will not lose its attractive appearance.
- Installation mobility. Everyone can create and install a wattle fence from plastic. The design is lightweight and convenient for transportation.
- Convenient operation. Unlike wicker fences made of other materials, PVC structures do not fade in the sun, they do not respond to temperature changes and humidity. In order for the fence to maintain its ideal appearance for a long time, it is enough to wipe it with a special tool on time. Metal parts need to be regularly treated with anticorrosive.
- Rich lineup. Fences you can choose any color scheme that will perfectly complement the landscape design of the site. It is also important to pay attention to the step and size of the PVC cells, which give the fence an unusual appearance.
- Reasonable cost. Due to the ease of manufacture, PVC fences have a low price.
And here is an article about autonomous gasification of a private house.
Prices for wicker fences
 Prices for wicker fences depend on the materialfrom which it is made, height and type of weaving. The cost of a willow or vine fence about 1 meter high is from 500 rubles per linear meter and above.
If you decide to decorate the site with a willow or vine fence, then you can make it yourself and for free. To do this, it is enough to prepare willow branches and stakes on which the wattle will be held.
The cost of fences from boards and PVC - from 750 rubles per linear meter.
DIY wicker fences
You can decorate the site with a wicker fence yourself. This will save and have fun. To make the fence original, you can master several types of weaving and think about additional accessories.
The easiest way to make wattle from willow or vine, it is more difficult to master the technology of manufacturing a fence made of wood and PVC. To do this, you will need special tools and assistants, it is difficult to make weaving from these materials alone.
Types of hedging
There are 3 main options for weaving a fence:
Horizontal weaving. This is the most popular type of wattle. Long branches of the plant are laid horizontally, located between the fixed vertical supports. The distance between the supports is selected depending on the flexibility of the branches. However, it should not be less than 30 cm. Otherwise, it will be difficult to lay branches.
 Horizontal willow wicker fence
Vertical weaving. In this case, the wicker fence implies the presence of two types of supports: vertical and horizontal. First, vertical supports are mounted on which the fence will be held, and then horizontal poles are attached to them, between which vertical rods will be inserted.
 Vertical wattle
Inclined weaving from rods. Weaving branches of the plant are located between the supports at a certain angle. This is a rather complicated version of weaving, so it is used in practice relatively rarely.

Independent wicker fence construction
We will analyze in sequence how to make wattle with your own hands. This work is not particularly difficult, which is why even a person who does not own any building knowledge can build such a fence. For work, we need two types of raw materials:
- Twigs. It can be flexible branches or vines of any plant, the diameter of which is 1-3 cm. It is believed that thicker branches are used in the case of the construction of a high fence. When they are harvested, the slices are made at an angle.
- Supports. It can be thick branches of a plant, sticks, stakes, wooden posts, metal pipes. If you procure materials in advance, then you can cut the trunks of young trees in autumn, which will dry out during the winter. The fact is that it is not recommended to use freshly cut supports, since they can warp when dried.
Do-it-yourself wattle fence is mounted in the following sequence. First, the supports are prepared for installation, and then weaving from willow or other branches is performed.
Selection and preparation of supports
First you need to determine the height of the supports. They should exceed the estimated height of the fence by 50-70 cm. It is at this depth that the supports will go into the soil. For example, if the estimated height of the fence is 180 cm, then the height of the supports should be 230-250 cm. The lower the fence, the finer the columns can be deepened.
If wooden supports are used, then they need preliminary preparation. Since part of the supports will be in contact with the soil for a long time, the wood must be protected from moisture. To do this, the dried supports are impregnated with an antiseptic, and then coated with one of the protective compounds. This can be melted bitumen or liquid bitumen mastic, drying oil, used oil, or any other composition available. The end of each pillar facing the ground must be sharpened if the pillars are driven into the soil. If they dig in, they do not need to be sharpened.
 Ready Pointed Posts on Sale
Installation of supports
Wooden poles are driven into or buried in the ground. Since it is difficult to drive a wooden column into the soil without damaging it, it is recommended to use a garden drill. With its help, holes of the required depth are drilled into the soil, into which the supports are inserted. After this, the pits are tightly clogged with rubble, construction debris or ordinary land. In some cases, thick pillars concrete.
The distance between the installed supports should be about 40-50 cm. This will provide free weaving of the rods of the plant. 2-3 extreme in a row of support can be placed closer to each other. This will provide structural rigidity.
Weaving rods
Prepared rods or branches are inserted between the supports. The very first branch is attached to the support using a wire. It is better to start inserting individual rods from thick ends, since thin endings can be bent and deformed more freely. During installation, you must ensure that all sections or ends of the rods are facing the inside of the fence. In this case, they will not be visible outside the site, and the wicker fence will have a more accurate look.
In the process of weaving, it is allowed to fasten each individual branch to the supports. This is even welcomed, because then the fence will be monolithic, and its integrity will not be disturbed by a gust of wind. At the joints of adjacent vines, it is also desirable to fasten the ends of the rods to each other by means of a wire.
Weaving is carried out until all the spans between the supporting posts are filled. The final rods are securely fixed with wire.
Wattle finish
The final step is to protect the rods from weather events and pests. To do this, the fence is covered with a layer of antiseptic protective impregnation. This work is very desirable to perform on both sides of the fence.
Wooden wattle is good in itself. However, it can be decorated even more. There are several ways to do this:
- To plant bindweeds that will curl up the bars near the fence. They will add greenery to your fence.
- Decorate the supports with rustic products: clay pots, artificial flowers, flowerpots.
- Cover the hedge with a stain. So it will be reliably protected from the effects of precipitation, and will take a more presentable appearance. Stain or impregnation is best applied with a spray.
We examined how to make a wicker fence on your site using improvised materials. One of the important advantages of such a fence is the ability to replace damaged rods or vines, as well as adding branches to the fence if the wood dries. This allows you to have on your site a very aesthetic and maintainable structure, built by yourself.