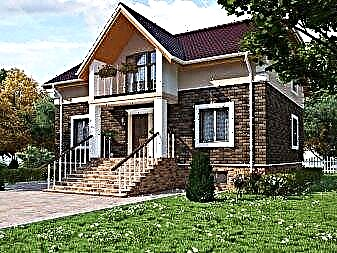
A free 8-800 number is available on the seller’s website.
To go to the site, click "To shop"
A free 8-800 number is available on the seller’s website.
To go to the site, click "To shop"
A one-click order is available on the seller’s website.
To go to the site, click "To shop"

Online seller is available on the seller’s website.
To go to the site, click "To shop"
A one-click order is available on the seller’s website.
To go to the site, click "To shop"
1. Find a suitable place
Separate rooms for the dressing room are only in new buildings, and even then their area leaves much to be desired. We don’t have to talk about old apartments. Therefore, the first step is to find free or underutilized space.
Most often this is a niche in the wall or a pantry. In this case, it will be enough to equip the storage system inside and close the opening with a door or at least a curtain.


If there are no such places in the apartment or their area is too small, you will have to "bite off" part of the living room. There are several options here:
- a place along one of the blank walls - the space is delimited by a screen or curtain,
- the corner at the junction of two walls - the dressing room is separated by a plasterboard partition,
- space behind the bed - at the head of the raised wall is raised from the same GKL.
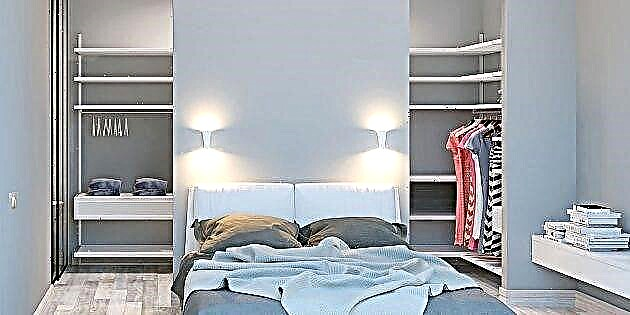
Ideally, the entrance to the dressing room should be from the bedroom. If the living space is very modest, the storage place can be equipped in the hallway, corridor or even on the loggia, provided that it is combined with the room and is heated.
2. Prepare the space
The next step will be cleaning and preparing all surfaces for further work. Completely clear the selected space: take out things, remove shelves, hangers and hooks.
If the walls are in poor condition, clean them from old plaster and wallpaper, and then level them. Remove the old floor and tidy up the base. Do not rush with the finish, it will be needed later.
3. Decide on the form
For the rational use of available space, it is important to choose the right configuration. Depending on the number and location of storage areas, there are several types of dressing rooms.
Which one is better will depend on the available space. In this case, the width of the room is a more important parameter, the length can be any.
One-sided dressing room
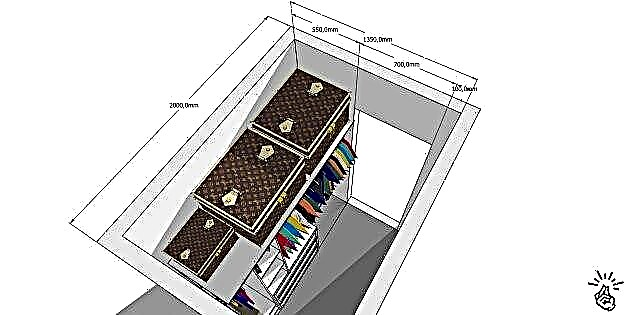
The most modest option. Shelves are located on one of the side walls. You need at least 1.35 m width: 60 cm for the storage area, 70 cm for the doorway and 10 cm for the door trim. If you cut it, you can fit in 1.2 m.
A special case of one-sided configuration is an L ‑ shaped dressing room. With sufficient length, it is easy to expand the shelves by adding additional shelves in front of the door.
Double sided dressing room
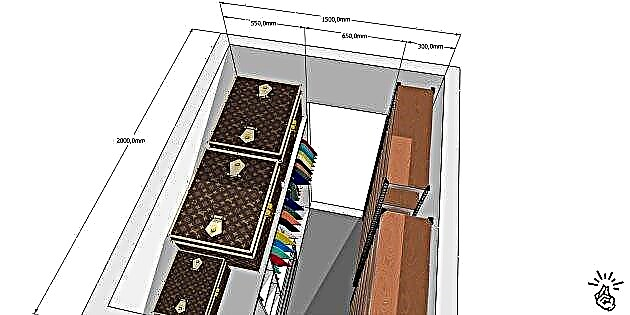
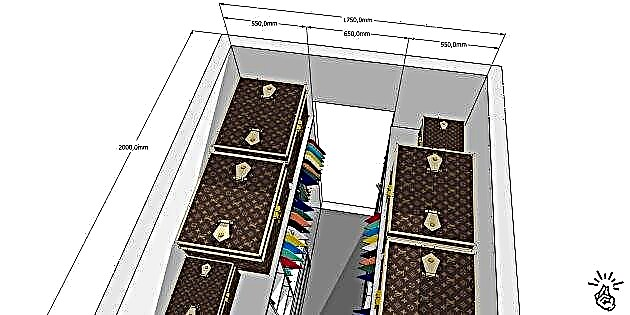
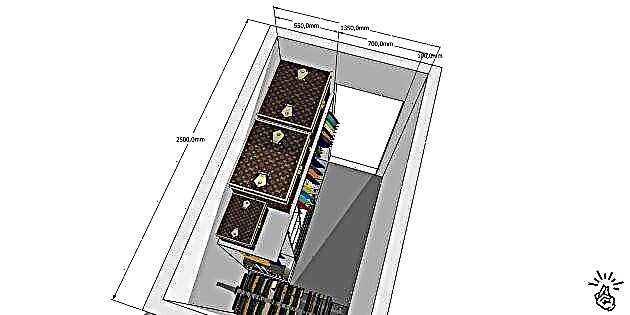
To install racks along both side walls, you need at least 1.5 m. In this case, 60 cm will be occupied by the main storage area, 30 cm will be auxiliary with shallow shelves and another 60 cm will remain for passage. With a width of 1.75 m, two full-fledged shelving units with a depth of 60 cm can be accommodated with a minimum passage of 55 cm between them.
Three way wardrobe

If there is 2 m of width, then in addition to two lateral storage areas of 60 cm, another one is added - a central one of 80 cm. For convenient access to clothes in the corners, hang rods for hangers and place them with overlap from right to left so that you can move it near things aside and get to the hidden ones.
4. Make a sketch of the filling
Once you have decided on the location and configuration of the dressing room, it's time to plan what will be its content. No one but you can better determine how many shelves for clothes, rods for outerwear and drawers for small items are needed. And also in what proportion it is worth allocating available space.
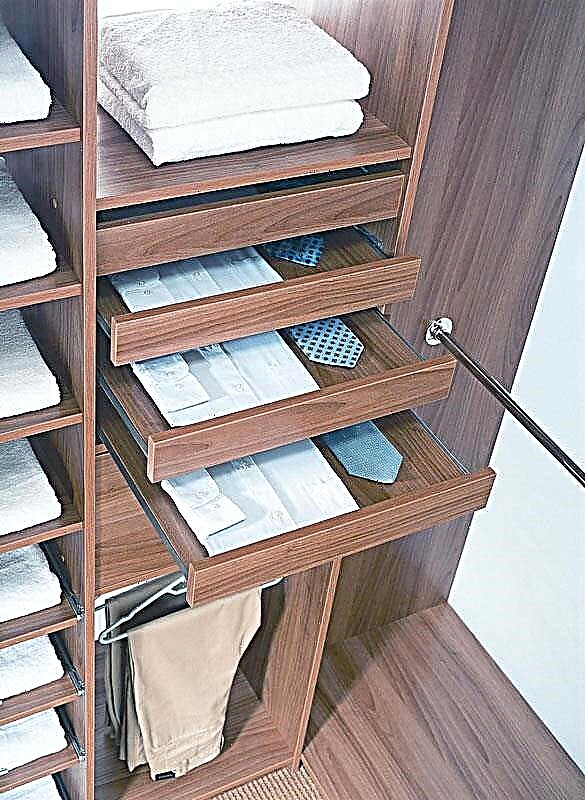
It is more convenient to organize a storage zone in three tiers. At the bottom there is a compartment for shoes and bedding, in the middle there is a compartment for clothes on hangers and frequently used things, at the top there are shelves for suitcases, pillows and seasonal dresses.

In width, they can be arranged as you like, based on the number of clothes. The main thing is to observe the dimensions of the compartments so that everything they need is placed in them. The optimal depth of the storage zone is 60 cm, with the exception of only shelves for shoes, which are best done at 40 cm. But the height depending on the items of clothing can be different.
- Shoes: 15–25 cm for low and 40–50 cm for high.
- Folded shirts and sweaters: 30–40 cm.
- Boxes for linen: 15–20 cm.
- Shirts and blouses on hangers: 110-120 cm.
- Pants: on a hanger - 140-150 cm, folded in half - 70 cm.
- Coats, long dresses: 120-150 cm.
- Suitcases, blankets, pillows: 45-60 cm.
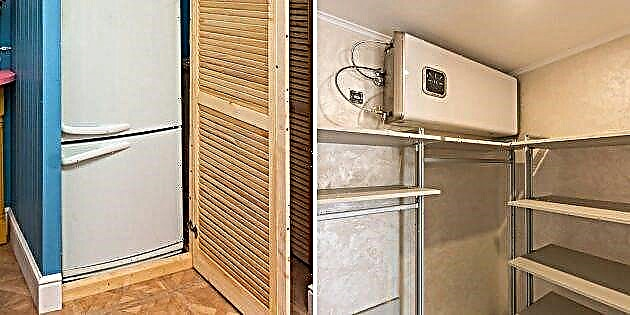
Usually nothing is stored in the dressing room other than clothes, but if space permits, you can place a vacuum cleaner, ironing board or boiler there. This will be especially true if you turned the former closet into a closet. In small apartments, some owners even manage to hide a freezer or refrigerator in the dressing room.
 propodval.ru
If you plan this, be sure to calculate the necessary dimensions to fit everything.
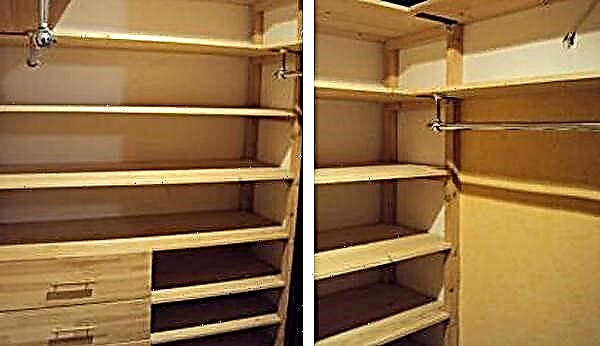
Cabinet

In this system, shelves, side racks, drawers, and everything except for hangers, is made of laminated particleboard. Details are interconnected by confirmations and can either be hung on the wall or just stand on the floor. Strong, reliable, fairly budget. It is realistic to assemble it yourself if you calculate the sizes and order a cut service in the store.
Modular
More modern and expensive option. It is created from separate modules, which are suspended from the wall rail on hooks. Mesh shelves and baskets, if desired, can be rearranged at any time, arranged for changing needs. The design is very easy to assemble, scalable and has an attractive, “airy” look.
Tubular
The simplest and cheapest system of all. It is built from thin-walled furniture pipes that can be attached to walls, ceiling and floor and connected to each other using special fittings. Shelves are made of chipboard or plywood. The system is easy to assemble yourself with a minimum set of tools.
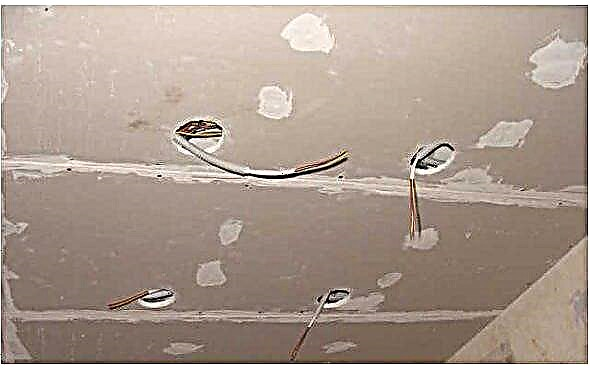
6. Mount the lights and sockets
Even in the smallest dressing room can not do without a light source. Ideally, there should be even two: the ceiling version and the lighting above the shelves.
For installation upstairs, it is better to choose the built-in spotlights so as not to steal the height of the room and not touch the chandelier with your hands when changing clothes. For shelves, it is most convenient to use LED strips. If desired, you can install lamps with a sensor that will turn on from movement or when opening doors.
Most likely, you will need a socket. At least for a router or if necessary, if you plan to place other devices and equipment.
7. Consider ventilation
In a windowless room with a large accumulation of clothing, the air will stagnate and things may have a musty smell. To avoid this, the closet must be equipped with ventilation.
The easiest way is to install louvered doors through which air exchange will occur. More complex and correct is the installation of an exhaust fan, which is connected to a central ventilation system. It starts by timer or with the inclusion of lighting. Air is supplied through the same blinds in the door or grille in its lower part.
If it is not possible to do either one or the other, just leave the door at least a little ajar for air access.
8. Erect partitions
If the dressing room is not equipped in a room specially designated for this, but in the living room, to divide the space, it is necessary to create partitions that will serve as walls.
The easiest way to perform them from the GCR. For this, a frame is assembled from metal profiles, which is then sheathed with sheets of drywall. If you plan to attach the storage system to the walls, then at the installation stage you should strengthen the frame with mortgages from a wooden beam in the right places.
After assembly, the walls are leveled with a thin layer of putty, and then the wallpaper is painted or glued. Design, as a rule, choose monophonic in light colors, so that things are clearly distinguishable against the background of the walls.
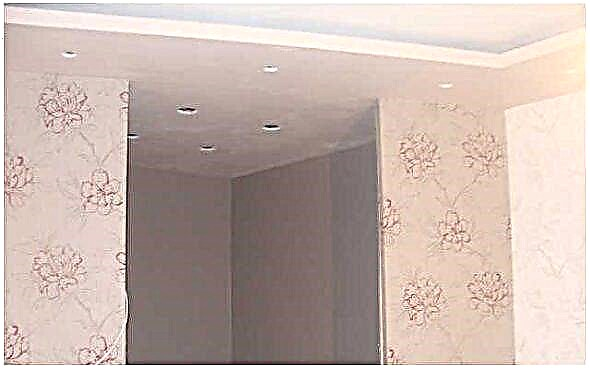
9. Make a ceiling
In principle, even the walls of the dressing room are not visible from the room, not like the ceiling. Therefore, if everything suits, it can be left as is or simply painted. If you do everything wisely, then you need to equip a suspended ceiling made of drywall.
In addition to a more aesthetic appearance, this will allow the installation of compact spotlights and hide unsightly ventilation ducts.
11. Mount the storage system
When the ceiling, walls and floor are ready, you can proceed to the formation of shelves, shelving and other filling wardrobe. Previously purchased and cut parts must be laid out in the next room, and then gradually assembled already in place according to the instructions or a previously created drawing.
12. Install the door
By and large, you can do without a door to the dressing room, but it’s better to close the door - it will be more aesthetic and protect things from dust.
 pinterest.com
The easiest option is a curtain made of thick fabric or a screen. More complex and correct is the installation of an interior door. It should be the same as in other rooms, so as not to get out of the overall design. The only exceptions are special louver doors for walk-in closets.
 pinterest.com
The canvas can open both inward and outward. In a one-sided dressing room with one free wall it will be more convenient to look inside, in all the rest - outward. But if the locker room goes into a narrow corridor, it is better to sacrifice convenience for security and make an opening inside.
 pinterest.com
Of the other options, budgetary accordion doors made of PVC are more popular and more expensive, but convenient sliding, as in sliding wardrobes. The latter are also good because they can be mirrored and used during fitting.
Place for a dressing room

With a properly planned dressing room, you can free the apartment from bulky wardrobe units, chests of drawers, bedside tables
First of all, you need to decide on the place. For the dressing room, a small space of up to one and a half square meters is enough. But where this place will be located is up to the owners to decide. As an option, it can be a bedroom, a corner between the walls, a balcony or a loggia, an attic - or a pantry, the presence of which is already provided for by the layout of the apartment.

When all things are gathered in one square, less time is spent on finding the right clothes
Types of dressing room
Depending on the location, there are several types of dressing room.
The corner dressing room is located at the junction of two walls. Effective in terms of ergonomics, the overall design of the apartment, visually smoothes the sharpness of straight lines. To separate part of the corner room from the rest of the room, it is better to use drywall, it is easily amenable to non-professionals and will help to save money. To fill the corner wardrobe, a L-shaped shelf arrangement system is used. The best location is the bedroom.

A corner cabinet is always more practical than a direct one and allows you to use a large free angle
This option is suitable for owners of the “pencil case” bedroom - an oblong narrow room. The U-shaped system visually equalizes the space and makes it more harmonious. Separate the desired part from the bedroom will help the wall, closet, or screen. The location of the shelves immediately on three walls will significantly save space.

This layout allows you to fill up all the free space.
- Parallel
It is located in the passage premises, as a rule, these are narrow long corridors. The parallel wardrobe room consists of two cabinets located opposite each other. Cabinets must be covered with a mirrored wall, sliding doors or a screen. This arrangement is especially convenient for storing street clothes and shoes.

Parallel arrangement suitable for walk-through rooms
It is an oblong sliding wardrobe, located near a blank wall with no windows. Fenced with sliding doors across the entire width of the wall, an opaque curtain or drywall. Alternatively, you can leave without a facade.

The linear layout resembles a very long and large wardrobe
Material and Tools
To separate the wardrobe, it is better to use sheets of drywall. It is lightweight, flexible, ductile, elastic. Hygroscopicity will not allow the air to stagnate, so you can not be afraid of unpleasant odors. The flexibility of drywall allows you to realize additional interesting ideas: cascades, arches, small niches. When working with drywall, there is a minimum of debris, so many hours of cleaning can be eliminated. With subsequent decor, he has no equal, but the shelves should not be attached to it - it may not support the weight.

Drywall partition for dressing room
To fence a wall, it is enough to have the following tools:
- metal profile 50-100 mm,
- drywall sheets,
- primer,
- insulation
- putty,
- fasteners
- screwdriver.
Creating a wardrobe room
The plan is ready, the drawings are drawn, the necessary materials are collected, the tools are selected - it is time to begin construction. If there is no separate room for the dressing room, you will have to wall the wall yourself.
- Fasten the top rail to the ceiling. Use the most suitable type of fasteners: dowels, anchors, butterflies, etc.
- Glue double-sided adhesive tape to the profile for a snug fit to the plane.
- Attach the guide pieces to the floor.

Along the perimeter of future walls, we install PN profiles on the floor and ceiling

We install vertical edges of the future design from PS profiles

Then we install horizontal stiffeners from PN profiles

Installation of a supporting structure from metal profiles for a suspended ceiling

We plasterboard the inner surface of the walls
After the whole structure is ready - proceed to puttying
Having finished all the draft work, we proceed to painting the ceilings and sticker wallpaper

The final stage - we install interior doors
In addition to the drywall, for the partition of the dressing room, you can use false walls, partitions, arches, decorative structures, furniture, vertical stands, screens.
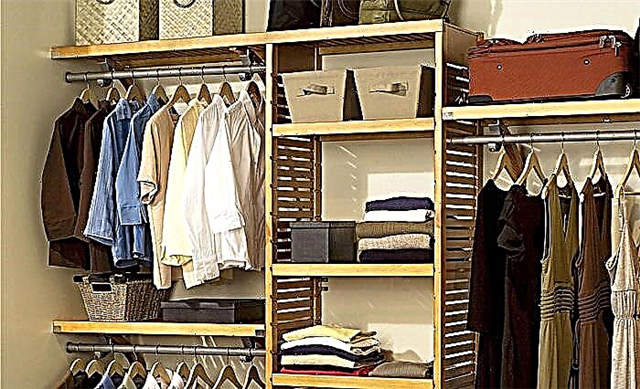
Wardrobe room filling
Today, the world market offers the most diverse filling for the dressing room: from budget Chinese organizers for things to world-famous furniture brands. However, given the average area of a city apartment, it is better to forget about furniture, since it threatens to fill the space where every span counts. The best organization is open shelves, drawers, hangers.

Convenient modular system allows you to install any element at any height
You can combine them together in three different types of designs.
- Cabinet. The hull structure uses wood panels. This type of structure is characterized by the presence of angular elements and rigid fixation.
- Cellular. In a honeycomb construction, mesh baskets are used instead of wooden crates. They are conveniently rearranged. The main advantage is the transparency of such a design.
- Loft. Good option for large areas. It features an abundance of metal parts. Boxes with baskets for things can be used from any material.
Each type of construction should fall under the general rule: three times more space should be allocated for rods with hangers than under shelves.
Do-it-yourself wardrobe shelves.
However, the option with purchased shelves may not be suitable for those whose dressing room has a non-standard form - or for those who want to create their own unique, inimitable design. In this case, you can make shelves for the dressing room with your own hands. In addition, making home-made shelves will cost less than purchasing full-fledged wardrobes.

DIY wall-mounted shelves for a dressing room
Shelves for things can be made of the following material:
- Chipboard
- plastic,
- plywood,
- tree,
- metal,
- chipboard,
- drywall.

Dressing room equipment made of round furniture pipe
If a tree is chosen as the main material, it is worth starting from its breed (it is better to use pine or spruce), type, quality, purity and humidity. The boards should be perfectly even, without cracks, crevices, voids and irregularities, and also absolutely dry.
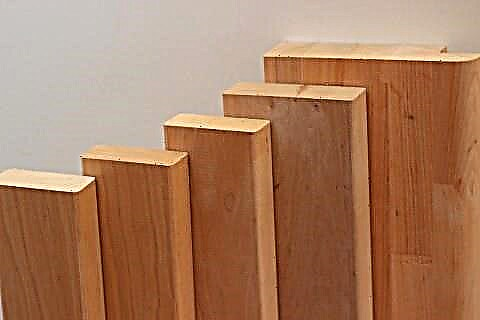
Wooden boards for shelves in the dressing room
The following types of shelves:
Decide on the type of shelf, location. When choosing a place, remember that there are three zones in the dressing room: the lower (up to 0.6 m), the middle (from 0.6 to 1.9 m), the upper (1.9 m and above). Consider the dimensions of the shelf, based on the total area of the room. Prepare the tools: a grinder, a jigsaw (hand saw), a screwdriver (screwdriver), an electric drill, self-tapping screws or screws, wood varnish, a brush, a square, a manual milling cutter.
When working, remember that each part must be processed with a grinder. Work should be done with gloves, they will protect your hands from injuries and allow you not to mess the tree.
Manufacturing process
Take for example a standard rectangular shelf with parameters 250X300X1100 mm.
- Transfer measurements from the drawing to the boards.
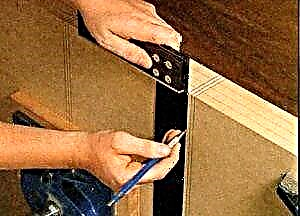
We mark the boards according to the necessary sizes with a pencil and a ruler
We lay the boards on a flat surface and cut out the necessary details from them along the previously outlined lines
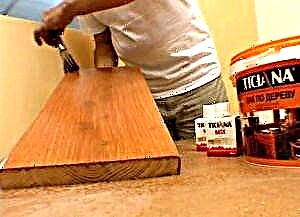
We cover all parts with varnish in two layers

In the places of fastening we drill holes
DIY wardrobe
It is advisable to make open shelves to simplify the search for clothes. Alternatively, you can make shelves with glass doors.
Dressing room design
What you need to remember when decorating a dressing room?
- Shine. The main rule of lighting is that the light should be as close to natural as possible, especially if there is no window in the dressing room. The most convenient lighting option is ceiling. For a small dressing room, it is necessary to install spotlights or LED strip. For a large chandelier, and for a corner dressing room - lamps on clothespins. Ceiling lighting can be combined with the illumination of sconces, floor lamps. As an option - lamps with a built-in motion sensor or lamps in the form of a decorative element.
- Ventilation. So that things do not dampen, so that mold does not start on them, it is necessary to carry out ventilation. An exhaust duct must be brought to the dressing room without a window by installing a fan at its entrance. It will provide the necessary flow of air masses.
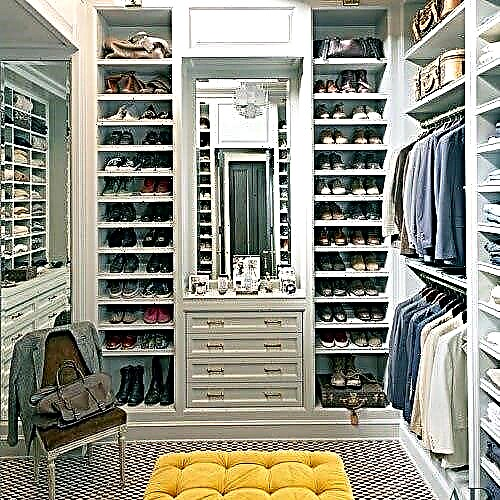
- Mirror. One of the main attributes of a dressing room is a mirror. For the dressing room, it is optimal to choose a full-length mirror to see your own image in full. The mirror can be hung on the wall or built into the door of the wardrobe, which will significantly save space. In addition to the main function, the mirror adds a wardrobe of light, helps to visually increase the space.
- Furniture. If space allows, a small table, ottoman or easy chair should be put in the dressing room. They are not only decorative elements, but also carry a functional load. It is important that the pieces of furniture are not bulky, but fit well into the decor of the room.
- Accessories Small decorative accessories will add brightness, make it more elegant, aesthetically pleasing. A small carpet in the center, glass vases with flowers or decorative stones or airy figurines will add extra gloss.
Dressing room design does not have to be independent. It must be done in the same style as the design of the entire apartment. To do this, you can choose the same color scheme or general, interior elements connecting all rooms.
Rules for storing things in the dressing room

DIY wardrobe room - project development
The following rules for storing clothes and shoes should be observed.
- Get separate shelves for men's and women's clothing. This streamlines the search for things, avoids confusion.
- For outerwear, select a place at the entrance. They have the most germs from the street.
- Do not mix underwear with bedding. Take separate shelves or baskets under them.
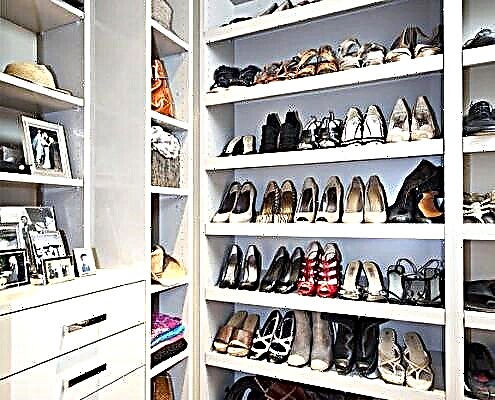
- For storing shoes, it is advisable to use a rotating shoe cabinet. A similar cabinet will include more pairs of shoes than regular shelves.
- For small items of clothing (underwear, ties, belts, etc.), take shelves with special cells.
- Use the entire space under the shelves for things: from the floor to the ceiling.
- In the upper zone it is convenient to store hats, bedspreads, seasonal items.
- Allocate the middle zone for storage of the most often used things. All rods with hangers should be located there.
- Adjust the lower zone for bedding and shoes.
By appointment
Functionality arrangement of the wardrobe room is a difficult task. But a few recommendations will allow you to profitably use the space:
- stands, shelves, drawers must be equipped at the bottom,
- the upper compartments are used for seasonal items,
- clothes hangers are placed in the middle,
- shelves for things that are constantly used in everyday life are positioned on the sides,
- you need to provide a box for hats, gloves, umbrellas.
Home furnishing is not just a lot of wardrobes. Shelves in the dressing room should be located so that things were easy to clean, get out. Therefore, it is better to think about a place for a small stool in advance. Photos of interesting options will help to properly equip the room. Some shelves can be closed with doors, but for this purpose it is better to use sliding flexible structures.

By location
The exterior design of the dressing room should be combined with the interior of the entire room. Regarding the internal arrangement of the "pantry", it is recommended to adhere to some rules. It is best to store here only shoes, clothes. Do not use it as a warehouse.
The wardrobe is divided into three zones:
- lower shelf up to 80 cm
- the middle part is 60-190 cm,
- upper section more than 1.95 m.
This makes it possible to use the space to good use. On the lower racks place things rarely needed: drawers with bedding, shelves for everyday shoes in the dressing room. The distance between the shelves should be at least 0.45 m, which allows you to store high boots without creases.
The middle modules are designed for objects that are used constantly - rods with different shoulders, drawers in which you can store your favorite photos.
Hangers should be placed in the middle, shelves in the corners. This will allow you to quickly find the necessary things. The height of the rods should be calculated in advance. Usually it is 190 cm to the first zone.


To size
When creating shelves in the dressing room, do-it-yourself measurements of all modules are carried out. The width of the middle section is from 0.5 meters (the usual size of the platinum shoulders is 0.45 cm). When determining the depth of the shelves, it should be noted that each member of the family has its own section for linen, hangers, clothes.
The typical size of the internal modules is 0.4 meters. Zones with shoulders, as well as mezzanines, are equipped with a standard width of 0.8 m. The lower modules can be of various sizes. For example, men's shoes are about 25 cm wide.
Retractable modules are a fairly convenient option for a small dressing room. Before you place all the shelves, it is better to make a list of things that are not often used, and put them on the bottom. Filling the closet with a lot of drawers is not recommended, because the store should meet the needs of the owner. The large width of the modules significantly complicates the free access to objects. For clothes, the standard size is 30-40 cm.


According to the material of manufacture
The choice of various options is wide enough. But the most practical materials are:
One of the most common materials is laminated particleboard. Modules from it turn out attractive, characteristics of a possible load are high. The cost of the material is available.
But its sawing should be entrusted to professionals, since this requires skills in handling chipboard, a special tool. It is preliminary recommended to familiarize yourself with the technology and adhere to the instructions.
Wood, strong, and not expensive breed - the best option for finishing wardrobe. Before you make a shelf, you need to choose the right material, based on the main criteria:
- breed - pine or “aromatic” spruce is better for modules
- view - un planed or clean planed board,
- quality - second-rate raw materials are suitable,
- humidity - low coefficient to prevent deformation,
- surface - clean, dry material,
- size - optimally 2x20x2500 mm, you can select other parameters.
All materials have their own characteristics, therefore, to argue that it is better to just one option is impossible. His choice depends on material capabilities and the general interior of the room, dressing room.


Optimum quantity and placement options
In order for all the free space to be used, it is better to abandon the housing modules and give preference to convenient shelves, drawers. The number of shelves depends on the size of the dressing room itself and other parameters. For the arrangement, most users prefer:
- shelving, pull-out or stationary shelves,
- pedestals, bars,
- shoe racks, dressers,
- suspended structures, mirrors.
Hangers are arranged in different ways:
- longitudinally - convenient, the most common option,
- end option - significantly saves space.
The latter method is used if the width of the dressing room is less than 65 cm. Spacious structures are equipped with longitudinal rods. Sometimes in several rows. To freely take things from the upper sections provide a lifting special system or stepladder. If the racks, the modules are left open, the “warehouse” will be spacious. For these purposes, hangers, open shallow shelves are placed at the top, and bollards, chests of drawers are located below.
In the upper sections are stored household items that are used quite rarely: underwear, sports equipment, seasonal clothes, and bags of various sizes. To make everything compactly located in the dressing room and not to clutter up the space, use narrow modules in light shades, closed boxes and shelving should be discarded. The number of racks must be calculated taking into account the fact that the owner of the dressing room is going to store family members in it, for which separate shelves should be allocated.


How to do it yourself
In order to build the modules in the dressing room yourself after measurements, calculations, you should prepare the tools, according to the following list:
- circular saw
- hammer drill
- manual milling machine,
- convenient cross screwdriver or screwdriver,
- technical pencil
- roulette, hammer,
- putty for working with wood,
- triangle-shaped ruler,
- varnish coating or any protective liquid, brush,
- sandpaper of different roughness,
- euro screws or screws,
- reliable furniture corners,
- guide rollers (if you plan to equip retractable modules),
- special overlays in tone of wood for fastening over screws.

To prepare the material and cut parts, the following is done:
- apply prepared pattern to the surface using a triangle, pencil, pattern, so that the accuracy of the lines is fully preserved,
- place the material on a surface that is only level,
- saw the board along the drawn lines,
- for curly parts, you can use a jigsaw or milling equipment,
- consistently sand the edges of all elements with rough sandpaper, then fine,
- varnish the surface, leave to dry completely,
- then apply a second coat,
- wait until the surface dries well, after which you can proceed to their installation.
Features of choice
The following structural elements are presented in this category:
- • Guides and brackets.
- • Shelves and rods.
- • Corners and connectors.
- • Rails and baskets.
- • Pendants and hangers.
- • Dividers and hooks.
For the manufacture of most components use durable steel. To protect against corrosion, parts are coated with a paint or galvanizing layer. Chrome devices are distinguished by a presentable appearance and a smooth surface that is pleasant to the touch. Individual elements are made of plastic or wood.
Order goods for arranging furniture systems in the house at the OBI store and use the temporary storage service in the warehouse.
Payment and delivery methods
- Buy goods online with delivery
- • You can pay by cash or bank transfer.
- • The date and time of delivery you agree with the operator by phone when confirming the order.
- • The conditions for the free provision of services depend on the city, the amount and weight of the product.
- • Unloading of goods, lifting and carrying belong to additional services and may be paid separately, check with the store operator.
Detailed information about the intervals and zones by city, the conditions for unloading and lifting the order are on the service page, where you can pre-calculate your delivery cost yourself, indicating the mailing address and parameters for unloading.
- Order and pick it yourself wherever you want
- • When filling out the order form, indicate the date and time convenient for you to visit the hypermarket.
- • You can pay by cash or bank transfer at the box office.
Purchased goods can be picked up at any of the OBI stores in Moscow, St. Petersburg, Ryazan, Volgograd, Nizhny Novgorod, Saratov, Kazan, Yekaterinburg, Omsk, Krasnodar, Surgut, Bryansk, Tula and Volzhsky.