How to properly lay the laminate with your own hands, the best step-by-step instruction will tell you. Before starting the production of these works, it is necessary to clarify whether it is possible to lay the laminate on a concrete screed, which layout scheme is better to choose, which rules need to be followed? Recently, the popularity of laminated flooring has been growing, so many people are concerned about the issues related to this type of coating, including whether it is possible to lay the laminate on an uneven floor or in bulk. Let's try to deal with most of them.
Laminate classes - which one to choose?
Before you figure out how to lay the laminate on the screed, or fix it to the floor, or how to properly lay the laminate on an uneven floor, you need to choose the right kind of coating.
What is a laminated coating? This is a structured layer consisting of pressed wood, specially treated with special substances.
It is necessary to select the base for cladding the floor surface, focusing on the classes of laminated panels, and not only on the external aesthetics of these elements,
According to European standards, the class is installed after testing on a number of parameters:
- ability to withstand sustained load,
- abrasion resistance
- resistance to shock, mechanical stress,
- ability to withstand different temperature indicators, their changes,
- layer adhesion level,
- exposure to sunlight
- slippery
- the likelihood of various kinds of spots,
- the presence of formaldehyde,
- antistaticity
- ability and speed of swelling under the influence of moisture.
Important! The features of laying the laminate with your own hands will in no way depend on the class of products purchased. The progress is always the same.
The most popular are such classes of laminated panels:
- 31: suitable for rooms with a small load. You can mount the laminate in the bedroom, office.
- 32: goes to equip rooms where the load appears more often (nursery, living room).
- 33: intended for rooms where the floor load is intense (dining room, kitchen space).
- 34: above the previous version, suitable for use in the bathroom, hallway.
The right class must be selected based on an important rule: high load and constant exposure to aggressive environments require the purchase of high-class raw materials.
Class 31 products are intended for use where the load level is minimal. Their service life is about twelve years, but the affordable cost makes it a popular type of product.
- heat resistance
- fire resistance
- medium abrasion resistance,
- impact resistance
- resistance to mechanical damage.
Important! Boards belonging to the thirty-first class are not suitable for those rooms where wet cleaning is often done, or the humidity level is high.
Class 32 coverage is suitable for rooms where the load is of medium magnitude. This gender can function up to 15 years.
- high quality flooring,
- strength achieved by the thickness of the boards up to 9.5 mm,
- high level of wear resistance,
- large selection of color palette, texture,
- reasonable cost.
Boards belonging to the 33rd class are laid where people are supposed to constantly walk, for example, in the corridor, in the kitchen. Manufacturers promise a service life of up to thirty years, without changing the external indicators of such a lining.
- high thickness (12 mm), providing excellent noise isolation and heat retention,
- the strength of the castle joints, additionally treated with wax products in order to protect against moisture and spoilage,
- possibility of laying in the bathroom,
- increased resistance to fire, slipping,
- lack of burnout under the influence of the sun's rays,
- affordable cost.
The thirty-fourth class includes a commercial variety of boards. They are collected in rooms where traffic is high, high humidity may be present. Manufacturers give a guarantee of their operation for 50 years.
Options and methods of installation
Layout options for the laminate in doorways or in adjacent rooms can be varied. Typically, this kind of coating is laid in one of three ways:
- Glue.
- The click system (with a plastic latch).
- Castle system "lock".
The glue technique is not used too often, it resembles the method that is used during installation of the parquet board. The essence of the method is the coating of panels with a special composition, after which the individual elements are connected to each other. As a rule, this method is used when the room will be actively used, therefore, optimal protection against the penetration of moisture into the existing gaps is required (here the adhesive base will fill them).
This floor allows you to lay the laminate on the curved floor, because there is no need to protect the castle joints. However, the method is rarely implemented, because the installation is time-consuming, the adhesive can dry out, which reduces the duration of operation, and it is impossible to repair individual sections of such a coating.
Most often, models equipped with a click lock system are used. Here, the installation is very simple, it is implemented using the thorn-groove method:
- one panel is inserted into the opening of another,
- maintains an angle of 30 degrees,
- panels are pressed against one another,
- a characteristic sound is heard
- With a block and a hammer, the panel is driven into the previous element.
The lock system works differently. Laminate with a lock is laid strictly horizontally with a small gap. The spikes are combined with grooves, after which, by the action of a bar and a hammer, they are fastened until the lock works. Some consumers ask, can these models be glued to increase their bond strength? To do this is irrational, if necessary, replace one of the accidentally damaged elements, it will be impossible to do this.
A laminate with a plastic lock is laid in a direct way, holding parallel to the direction of light. If the geometry of the room is such that it makes it possible to use diagonal or perpendicular methods, then in practice they are implemented, moreover, the bulk floor under the laminate will be bedded or a different leveling method selected, it does not matter.
The lighting conditions of the apartment, as well as the design decision, require the selection of one of the panel layout options:
- Classical
- Chess.
- Diagonal (deck).
Important! The main conditions for each of the schemes is spreading the cover: each panel of the next row is moved forward by 20 cm. This option allows you to emphasize the geometry of the room, emphasize the advantages, hide the disadvantages.
The classic scheme allows you to lay the laminate in the doorway and inside the room. It is considered the most economical, and therefore it is used very often.
- the process allows you to hide the unevenness of the floor, it starts from the wall, runs parallel to the rays of light coming from the window,
- the remnants of panels from one row go to the beginning of the next,
- trim panels is required at the door, around the heating pipe near the battery,
- experts advise using only those cuts whose length exceeds 30 cm,
- An important advantage of the scheme is the presence of no more than 5% of waste.
A checkerboard or brick arrangement of panels requires the displacement of the boards of each row by half of the board of the previous row. The main disadvantage of such schemes is the obvious cost overrun of raw materials, amounting to about 15%. However, this technique allows you to increase the strength of the coating by about 2 times.
The diagonal arrangement of the laminated elements practically does not differ from the classical one. Here, work is carried out from the wall on which the door frame is located, observing an angle of 45 degrees. Such a coating looks incredibly elegant, it allows you to achieve visual expansion of even very small rooms.
Overuse of raw materials with a diagonal folding method can be about 10%, in long rooms up to 15 cm. Specific indicators will depend on the geometry of the space.
Foundation preparation
Can laminate be laid on uneven floors? According to experts, if the floor is uneven, then starting work is not recommended. Without a properly made floor leveling, there will be no certainty that the coating will lie properly, and one cannot expect a long service life.
Laying a laminate on an uneven floor can cause it to last even less than the minimum term promised by the manufacturer. This type of coating does not tolerate distortions, chips, dirt.
When it comes to a concrete base, there are a number of subtleties:
- Be sure to check the level of the cement or other surface,
- sometimes it becomes necessary to lay the laminate on the self-leveling floor, with the beacons being exposed. By the way, the question here is whether it is possible to lay the laminate on a concrete screed. This option is allowed, most importantly, the presence of an even layer, without a single gap. The specialist will help answer the question of which bulk floor to choose under the laminate,
installation on wooden boards involves tracking the level, with subsequent correction of the defects found. Here you can apply looping, or alignment with a plane, - sometimes it’s more profitable to completely dismantle wooden floors, fill the desired level, or just sew plywood,
- after completing all leveling work, carefully remove all traces of dust from the surface.
Installation of insulating layer and substrate
Having considered the issue of preventing such a situation as laying a laminate on an uneven floor, it is necessary to clarify where the entire installation process begins. Before laying the laminate near the walls and throughout the space of the room, it is necessary to prepare the substrate and carry out the necessary insulation work.
Before laying the laminate, you need to take care of creating a powerful waterproofing base. The fact is that laminated panels easily absorb excess liquid, so it is important to separate them from the plates using a layer of vapor barrier film (its thickness should be from 200 microns).
Carrying out the laying of the laminate with your own hands, you must not forget about the need to put a substrate between the film and the final cladding.
In its quality may be:
- pulp of wood and paper,
- bung,
- foamed polyethylene,
- foil type of expanded polystyrene.
The substrate under the laminate is placed in order to equalize the remaining floor differences, in addition, it has the ability to increase the performance of heat and sound insulation.
Panel joining methods
Before considering how to lay a laminate in a doorway, you need to pay attention once again to the ways in which panels can be connected to each other. Fixing laminate with adhesive is extremely rare. This option is suitable for fixing the laminate without locking joints.
Much more often, the click and lock methods described above are used. They allow you to easily frame the transition of the laminate from room to room. How to lay a laminate at home with your own hands step-by-step instructions will help to consider in detail.
Laminate calculation
We lay the laminate with our own hands correctly. Therefore, we preliminarily carry out calculations to determine the exact amount of raw materials that need to be purchased before the start of work.
The calculation process goes like this:
- find out the area of the room in which the work will be carried out. To do this, measure the length and width, multiply these indicators,
- according to the same formula, specify the area of the laminate on the floor. Most boards are one meter long, so they only measure the width of the panels,
- after it remains only to divide the area of the room by the same amount of panels to get the required number of boards.
Important! Installation of a laminate between rooms without thresholds or with it requires careful calculation of the required amount of material.
Step-by-step instructions - how to lay a laminate with your own hands
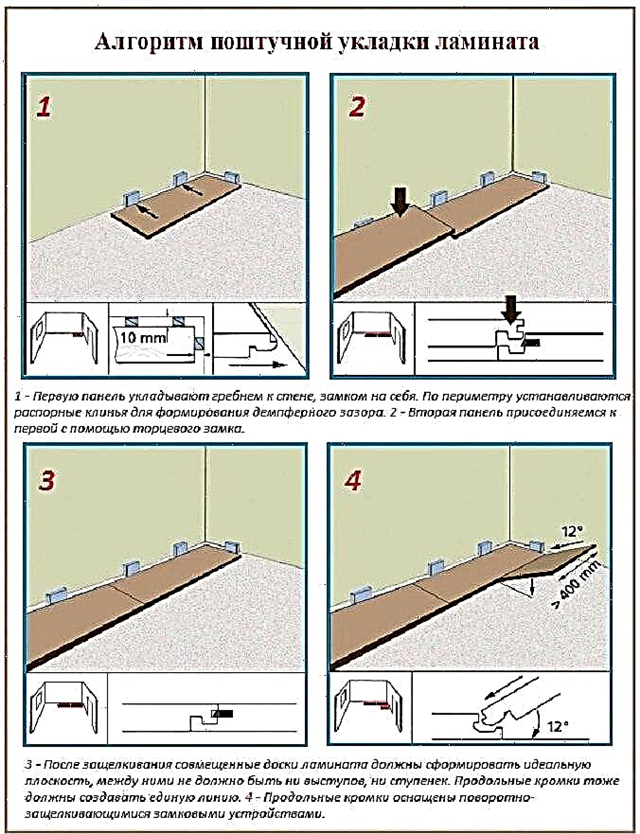
The installation instructions for the laminate involves the following steps. First, we will study the castle method of installing panels:
- Spread the substrate, carefully glue all the joints using adhesive tape.
- Saw off the protruding comb from the board.
- Form a deformation seam by placing wedges, it should be 8-12 mm. This element is mandatory, it allows you to obtain uniformity of narrowing / expansion of the laid layer with a change in humidity, air temperature in the room.
- Having reached the end of the first row, it will be necessary to cut the board, it will be more convenient to do this with an electric jigsaw and a construction corner. How to put a laminate under a door frame, we will consider below.
- Installation of the next row will begin with the cut off element, the main thing is that it is more than half of the panel.
- It is better to prefer a staggered order of placement, it will achieve uniform loading of seams.
- Each panel is attached to the groove at an angle, carefully inserted, hammered with a rubber tip with a hammer to obtain the optimal connection of the elements.
- The last row (not counting the installation of the laminate around the heating system) is mounted with a bracket. Be sure to leave a gap.
- Laying the laminate near the door is carried out further.
- When the work is finished, remove the wedges of the strut, mount the skirting board.
Important! You cannot hammer with a hammer on top of the panels, it is so easy to damage the top layer; for this purpose a block or unnecessary scrap of the board is laid.
The glue variety of installation works has a lot of advantages:
- after drying the composition, sufficient coating strength is obtained that exceeds the indicators achievable by fastening the grooves,
- laying the laminate near the pipes will be done as accurately as possible,
- glue minimizes the probability of dust, moisture, dirt getting into the joints,
- laying the panels on the self-leveling floor allows you to hide the existing height differences (can these elements be glued for long-term operation, will depend on the quality of the work done and the materials used).
This installation method also has some disadvantages:
- the impossibility of mounting to the "warm floor" system,
- it is forbidden to use PVA glue, only special compounds should be used,
- it will be possible to use the surface for its intended purpose only after the coating has completely dried,
- secondary use of boards after their forced dismantling is not possible.
Laying a laminate deck method using glue is as follows:
- Prepare the base: spread the insulation layer, lay the substrate, save the expansion joint. Here all the same actions are performed as in the previous case.
- Dilute the adhesive, strictly following the manufacturer's instructions.
- Remove the protruding groove from all panels that make up the first row.
- Attach the first element to the wall, insert the wedges and form a compensation gap.
- Apply the adhesive to the end face that protrudes.
- Connect the boards, remove the remaining glue, not waiting until they harden, then this will not succeed.
- Knock down panels if necessary.
- Repeat all steps for the remaining rows.
- To remove expansion wedges, to mount plinths.
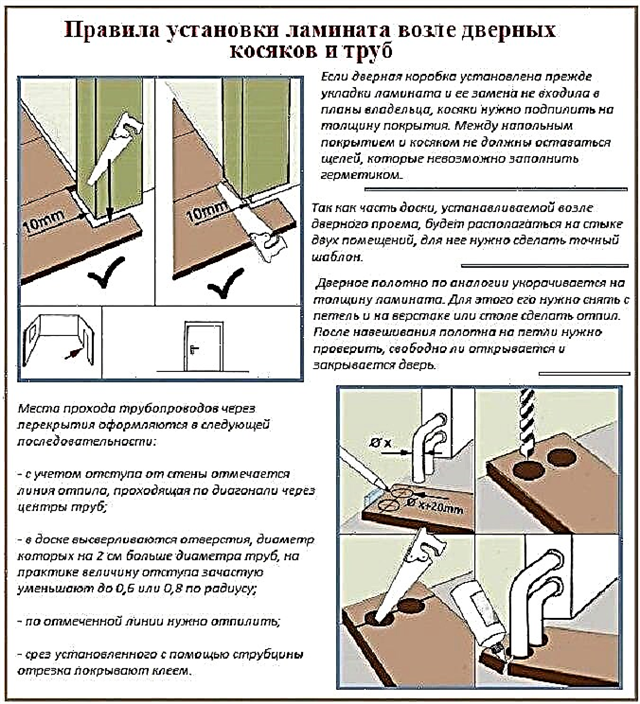
Laying laminate around pipes and near doors
All types of laying laminate necessarily involve work around the pipe, with thresholds and without thresholds, as well as features for solving the problem of how to get a laminate under a standing door frame.
The work process goes like this (regardless of the selected types of installation):
- Cut the desired segments, taking into account the measured parameters.
- Measure the distance from the center of the pipe to the wall. Mark the center line on top of the panel.
- Clarify the distance from the end of the board to the center of the pipe, mark the perpendicular, thereby obtaining the center of the pipe.
- Measure the diameter of the pipe, add 8 mm to the resulting figure (this is necessary for the expansion joint). With a compass to mark the place of the cut.
- Make a hole using an electric drill equipped with a pen drill. You need to saw the board along the center line so that then there is no problem how to join the laminate.
- Joints need to be smeared with glue.
- Glue the laminate very carefully. preventing the formation of shifts.
Laying a laminate in a doorway can occur in one of three ways:
- Joining the laminate in the doorway with the initial installation of boards and the subsequent installation of the box.
- Sawing up the existing coating with respect to the height of the lamellas. The latter then run under the box.
- The last way, how to connect the laminate between rooms, will be flush cutting. It is carried out when the whole structure is already standing. This option is best performed only by professionals, without proper experience, the result may be unsatisfactory.
Layout methods for laminate flooring
There are different options for installing lamellas, each of them has its own characteristics. The deck layout of the laminate, the scheme of which is presented, allows you to get the most striking room geometry. In addition, methods are often chosen when the boards are laid perpendicularly or parallel to the light source (window).
Which method is better, ladder or diagonal, you need to clarify based on the specific features of the existing premises.
Laminate Care
Having figured out how to make the floor of the laminate with your own hands, specifying how to lay the laminate in the doorway, you can not stop at the features of caring for this coating.
It includes a number of important rules:
- dryness preservation
- timely removal of water with a soft cloth,
- the use of special sealant to maintain the integrity of the locks (especially when the coating is in a room with a high level of humidity),
- prohibition of the use of aggressive detergent compositions, products containing a large amount of glycerin,
- contamination should be removed with a well-wrung cloth previously moistened with water diluted in it with a means to care for such coatings.
First rule
You can not start installation immediately after purchase!
Panels in the original packaging must be acclimatized.
Acclimatization- this is the alignment of the temperature and humidity of the building material with the temperature and humidity of the room where it will be laid.
This is especially important in the winter months when panels are brought in from unheated storage areas.
Therefore, it is necessary to leave the panels in the room where they will be mounted for at least 48 hours.
At the same time, the room temperature should not be lower than 15 degrees Celsius, and humidity not more than 60%.
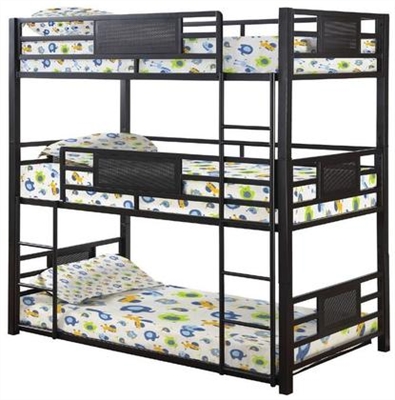
It is advisable to lay the packings of panels separately from each other or not more than two floors on top of each other, as shown in the photo below.
After two days, the temperature and humidity level of the material will be aligned with the humidity of the room.
Optimal conditions for laminate flooring:
- indoor air temperature - 18-22 degrees Celsius,
- humidity 40-65%.

Second rule
For high-quality production of all work in the room, it is necessary to ensure the availability of good lighting.
Packs with laminated boards should be unpacked on the day of installation.
Each floor panel should be checked, before installation and during installation, for possible damage to defects visible to the naked eye (difference in decor, size, degree of gloss, etc.).
Inspection should begin by inspecting the packages in which the panels are located.
Damaged panels are not suitable for installation.
For proper laying of the laminate, you should carefully read the manufacturer's instructions, which is located in each pack.
Third rule
We make a marking for laying the laminate, i.e. we calculate the necessary technological margins (gaps) from the walls and other protrusions, if any.
To do this, measure parallel walls relative to each other in length so that the flooring lies evenly.
If any deviations are found in the geometry of the room, we take them into account in the calculation of deformation gaps.
1. First of all, you need to calculate the width of the last row of panels, which should be at least 50 mm, and the length of the last row of panels, which should be at least 300 mm.
This can be done using a tape measure, or lay out one line of laminated boards in length, the other in width.
The requirement for the width of the last canvas of at least 50 mm is due to the fact that this will allow you to snap the lock without difficulty.
If, when calculating the last row, the width or length is less than the recommended dimensions, then the first strip of the flooring should be cut accordingly in width and / or length.
2. In addition, between the panels and all the fixed elements of the room (walls, columns, door frames, pipes, etc.), it is necessary to leave a gap of 8-12 mm (most often leave a gap of 10 mm), the so-called expansion joints, technological or expansion gap.
Because under the influence of changes in temperature and humidity in the room, laminated boards expand and contract, i.e. dilation occurs.
Dilatation- This is the process of increasing the volume of material under the influence of temperature conditions, intense saturation with moisture.
This process accompanies almost all building materials with a porous structure - brick, wood, OSB, plaster, magnesite, laminate, etc.
Therefore, it is impossible to produce flooring close to the walls and other fixed elements of the room.
Otherwise, during expansion, the panels under high pressure will run into obstacles (walls or others), and due to the fact that they have nowhere to expand further, the expansion energy will go to the middle of the floor (the weakest point), thus, deformation of the floor (bending, bloating, etc.).
Expansion (thermal) joints with a size of 10 mm are a sufficient gap for unimpeded expansion of the laminate floor, i.e. the floor remains level.
Another function of thermal joints is that they allow the laminate to breathe, and remove the moisture formed underneath.
In addition, indents prevent the transmission of sound from the floor to the walls.
How to put the first laminate panel?
The laminated panel has only four sides:
- two sides with a small (narrow) scallop (protrusion, groove, lock)
- two sides with a large (wide) scallop (protrusion, groove, lock)
We lay the first sheet of the laminate with the end and lateral sides to the walls, namely with narrow scallops and rest it against the distance wedges.

We apply the second sheet evenly with the entire surface of the end to the end (lock to lock), of the first sheet, at an angle of about 15-20 degrees, while the first and second sheets should form an even straight longitudinal plate consisting of two panels, without any gaps.
As the saying goes "flush."

Common errors when joining laminated boards.
Error No. 1 Docking starting from one corner:
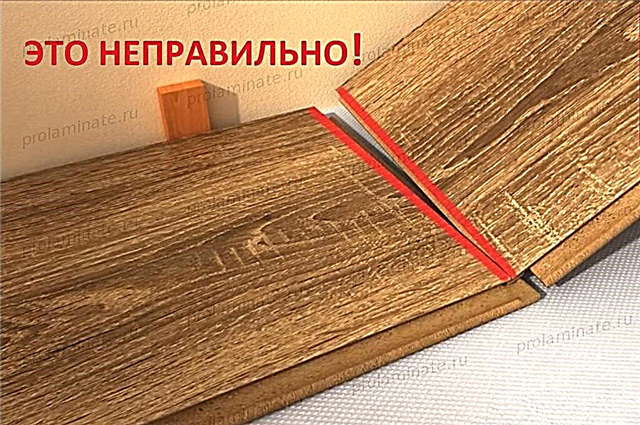
Mistake number 2 Docking by entering the lock groove:

Dock all panels in the correct way to the opposite wall.
The final sheet of the laminate is cut to the right size on the right, so that it lies evenly and in contact with the remote wedge installed at the opposite wall from the beginning of laying.
At this stage, you can praise yourself and be happy, because the beginning has been successfully laid.
To lay the second line, we cut the first board, on the left side, with a length of 300-650 mm, so that the flooring is staggered, which ensures reliable fastening of the floor.
If you have a question: “how to fix the laminate?”, Then know that the laminate is placed in the emphasis of the wedges so that it lies motionless during installation, at the end all the wedges must be removed.
In the future, all the laminate boards will be kept together on their latched locks, this method of laying is called "floating".
How to lay laminate with 5G lock?
For example, when mounting panels with a 5G lock, the second and subsequent strips begin to fit with the connection of the long sides of the panels (ends).
To do this, first insert the panel at an angle of 15-20 degrees with a comb in the groove of the already laid board, then carefully lower it to the floor.

The second board of the second and subsequent rows is also laid with the long side to the already laid sheet, and with the end face to the lock of the previous board.
With a glance we check whether everything lies smoothly.

If everything is smooth, then with one gentle blow, with your hand or with a special rubber hammer (mallet), applied from top to bottom, along the edge of the laid board, from the side of the butt end, we snap the lock.

Now all locks are snugly and securely latched.

How to lay a laminate with a click or loc lock (click, lock)?
To properly lay the laminate with your own hands with click or lock locks, use the following method.
Installation of the first chain of boards is no different from laying by any other means, i.e. docking of the panels occurs.
The first sheet of the second line is joined side length to the first line of laminated boards.
The second and subsequent laminated sheets are laid, joining exactly the ends.
Then, joining the second board with the first, third with the second, and so on, we get one continuous long strip, which we join along the length of the first row by lifting the edge of the second row panels closest to us and pressing the far edge to the edge of the first row of the laminate.
So that the locks snap into place, and you get a single, flat plane, consisting of two rows of flooring.
By analogy, we do the following rows.
For laying a laminate with clicks, locks and others, a single mounting method is also used.
Those. the first board of the second line joins the long side to the first row.

The second board of the second row is joined end-to-end to the end of the previous sheet of the current strip of the flooring, and gently lifting this structure, from the near side to itself, consisting of the first and second sheets of the second row, we put the far right edge of the second sheet into the lock of the laminated board on the long side first row.
Then we lower them gently to the floor.

Thus, it turned out that the far edge of the second sheet of the second row is in the lock, and the middle and the near (left) edge of the sheet of the second row are not snapped, i.e. there is a small gap of 1-2mm.

To snap the second sheet fully, we hold the second sheet with our right hand at an angle of 15-20 degrees, and gently knock the left edge of the second sheet, second row, with the left hand so that the lock clicks.
We check whether everything is tightly docked, if we see that there is a small click, it must be removed.
To do this, take the near edge of the aligned panel and gently raise / lower it, by about 30-50 mm, up and down, while squeezing it so that the panels close tightly, which happens literally on 3-5 raising / lowering.
In order to avoid pain in the left hand, after such tamping, we recommend using a special tool - a bracket for screeding laminate flooring or a damper (block) and a mallet hammer.
Also, for these purposes, you can use a segment of the laminate with a size of at least 200 mm, which is neatly inserted into the groove of the laminated board of the laminate and by hitting the piece with a hammer, the lock on the panel latches.
At the same time, the panel itself remains unharmed, because we strike with a hammer over a special segment, which we will subsequently throw away.
Read more about the tool used when laying the laminate, see here.
Laying the last row of laminate
We join all rows of the laminated floor by analogy with laying the second coupler.
We do the last row in the same way, but because the last row will be directly near the wall, then the wall will disturb us.
Therefore, for joining the longitudinal sides of the last line of the flooring with the penultimate row, we use a special bracket for laying the laminate or a simple nail puller.
These tools allow you to smoothly and with sufficient force to press the narrow panels of the last row to the penultimate and snap locks.

At the end of the installation of the laminate, we remove all the remote wedges, and leave the floor for 2-3 days (see the manufacturer's instructions) so that it is thoroughly laid down, i.e. Use the floor no earlier than 48 hours after installation.
At the end of all the work, we install skirting boards that will hide the expansion joints.
How to install skirting boards, see here.
Choosing a layout method
An experienced master will say: the right finish is laid at the design stage. It is not necessary to develop a professional drawing and make an estimate. A fairly schematic image of the room, which shows where the doors and windows are located. If you present the final picture, choosing a layout method is easier.
In total there are over 50 styling options. We will not consider all of them: it is unlikely that a finisher without experience will decide to use a complex method. It is enough to choose one of three basic methods.
- perpendicular to the window: if the lamellas are positioned so that the direction of the joint seams coincides with the direction of the sun's rays, the joints between them will become invisible,
- parallel to the window: the resulting shadow will emphasize the joints, but the room will seem more spacious,
- diagonally: the way the owners like it.

Usually choose the first option. It gives the impression of a monolithic floor. The second method is suitable for a long and narrow room: it will be possible to stretch it in width. In both cases, the laminate should be taken with a margin of 5-7%. The third method is optimal if the area of the room is small or you need to divide it into zones. In this case, the stock of material should be at least 15%.
What will be needed for styling?
It takes 3-4 hours to lay a laminate in a room of 15–25 m2 on a finished foundation. This type of coating refers to "floating floors", which are not fixed rigidly on the base from below, but simply lie on it without fastening. Therefore, it is only necessary to lay out individual laminate lamellas on a screed or flooring from wood slabs, connecting them firmly together.
To lay the laminate from tools you will need:
- roulette,
- hammer,
- pencil,
- building level,
- jigsaw or a hacksaw with a thin tooth.
Nothing particularly specialized for the installation of the coating in question is needed. No special skills are required for this. Without problems and correctly handle the specified tool in the state of most home masters. This installation of interior doors with your own hands can still cause difficulties. With a laminated finish, everything is much simpler.

Laminate in the interior
In addition to the lamellas of the laminate itself, in order to lay it on the floor, a plastic film for waterproofing will also be necessary. Plus, you need a substrate of cork, foamed polyethylene or other similar material. The task of this lining is to increase sound insulation and load distribution from individual planks of the laminated coating to the base.
It is not recommended to neglect laying the substrate. It is provided by all step-by-step instructions from laminate manufacturers.If you do not put it, then you can immediately forget about the guarantee for coverage.

Floor Layout Options
Floor preparation
In order for the laminate to serve for a long time, the base under it must be perfectly even. Differences in height are permissible only within a couple of millimeters per meter of coverage. If there are more bumps on the rough floor, then the lamellas will go apart at the joints due to the uneven distribution of the load.
Laying the laminate is lowered to the base of:
- floorboards and planks of parquet,
- wood boards
- tile
- linoleum
- concrete (screeds or floor slabs).

Styling tools
The main condition is that the base must be smooth and stable under the feet of a person walking along it. Bending boards or recesses (bulges) on a concrete surface are not allowed here. If there are such flaws on the rough basis, then they should be eliminated before starting to lay the laminate.
If the floor or flooring meets the requirements for flatness and resistance to stress, then it can be left. Otherwise, it is necessary to dismantle this base and equip a new one.

Floor leveling
To level the rough base, most often use a wet or semi-dry floor screed from the DSP. This is the most reliable and durable option. Concrete is able to withstand heavy loads and is resistant to moisture. However, it will take up to three weeks to set and solidify. If it is decided to lay the laminate on a concrete screed, then the repair in the house can last more than a month.
The rough floor is also made of gypsum boards, chipboard, fiberboard or plywood. This option eliminates wet processes and is faster, since there is no need to wait for the cement mortar to set. However, with pipe ruptures, such a base usually has to be completely or partially replaced with the laminate. Contact with water to wood and gypsum sheets is contraindicated. But in finished form, such a prefabricated screed weighs much less than concrete.
Substrate
Almost all manufacturers prohibit laying laminate without a backing. This underlying layer is needed to redistribute the loads on the floor, reduce noise and additional insulation of the laminated lamellas from moisture from the bottom from the base.
Most often, as a substrate for a laminate, they lay a film of foamed polyethylene 2-3 mm thick. She is not afraid of moisture and is cheap. But you can use analogues from cork, needles and expanded polystyrene. Cork and coniferous varieties belong to natural environmentally friendly materials, but come into disrepair from contact with water. Expanded polystyrene plates are distinguished by increased noise and heat insulation, but combustible.

Methods for laying laminate flooring
Before you go to the store for the coating in question, you must carefully understand how to calculate the laminate flooring for a room of a specific quadrature in pieces. Nobody needs the extra material, and if there is a shortage of it, it’s far from always possible to get exactly the same slats for the ones taken earlier. And here an important role is played by the way the lamellas are laid out on the floor.
Laminate strips are laid in two ways:
The first is easier to install and requires less material. In the second case, there are much more scraps due to the need to cut the slats at an angle near the walls. But diagonally laid lamellas in the assembly look spectacular. Moreover, in both versions, the boards are stacked with a shift of 10–35 cm to the next row.

The connection of the laminate strips is done with and without glue. The use of the adhesive method is recommended when it is required to increase the moisture resistance of the entire coating. Water then cannot penetrate the joints between the lamellas and does not harm the substrate and the lower layer of the laminate.
Moreover, the second option is often more preferable. After laying the laminated finish without glue, it can be dismantled if necessary to replace one or more lamellas. Glued boards cannot be disconnected without damage.
The connection of the laminate is carried out by end locks:
- "Lock" (groove crest).
- “Click” (simple latch).
- UniClick (complex latch).
The first of the locks is the weakest to break, and the third is the most durable and reliable. However, if the laying of the laminate is done professionally, then all of them guarantee a strong connection of the lamellas into a single laminated coating.
Laminate laying principle
How to cut a laminate?
You can cut the laminate with your own hands into the necessary details:
- electric jigsaw
- small hacksaw for metal,
- durable construction knife.
When cutting, it is necessary to ensure that cuts and scratches do not appear on the upper decorative layer. Then, on the surface under the sun's rays, they will all be visible to the naked eye. That is why it is not recommended to use a hacksaw on a tree with a large and medium tooth. She can cut without receiving ugly furrows is almost impossible.
Laying laminate near the threshold
To get an even cross-section, it is best to use some kind of metal guide or square. And it’s worth cutting holes for pipes slowly with a knife.
Using these tools almost always gives a burr-free cut. If they did form, then such rags can be cut with a knife or ground with a flat rasp on a tree.

Laying the floor around the pipes
Recommendations
Lay the laminate in compliance with the following simple rules:
- Before installation, the lamellas must lie in the room in a horizontal position for at least a day to cool or warm to room temperature.
- Laying the laminate is allowed exclusively on a dry base. If a concrete screed was originally made, then laying the coating is permissible only after it has completely dried.
- Before starting work, the rough foundation must be carefully swiped so that there are no pebbles and other debris left on it. If they are left under the laminate, sooner or later the substrate will first tear, and then the coating itself will be damaged.
- To identify differences on the rough floor, you should use a long rule or level - the slightest deflections will be visible in the appeared gaps.
- Planks are best stacked from the window so that the seams along the locks are less visible in daylight.
- Between the walls and the laminate, compensation gaps of 8–10 mm wide should remain. Without them, the laminated coating, upon thermal expansion, abuts against the wall surface and rises in the middle of the room with a tuber.
- To ensure that the lamellas do not move during installation and do not close the gaps along the walls, spacing wedges should be placed. Then they are cleaned.
- Compensation gaps must also be made in the middle of the room if the coating is obtained in a length of more than 10 meters. After these seams are to be closed with decorative sills made of plastic or metal.
- The substrate and waterproofing should be glued with adhesive tape at the joints of their individual strips. At the same time, it is impossible to nail this sublayer to the rough base with carnations or screw it with screws. No holes are allowed here.
- The first row is laid to the wall with a spike, for which it is pre-cut so as not to interfere.
If the walls are uneven, then the installation of spacer wedges and laying the first row should be given special attention. The more evenly the first lamellas are laid out, the more reliable the connection of all the other slats will come out.
If you strictly follow the step-by-step instructions and recommendations, then the laid laminated coating will last for many years. There is nothing particularly complicated in its installation. This is to figure out how to choose the front door to the apartment and then mount it, you have to turn on your head to the fullest. With this floor finish, everything is not so scary.

Conclusion
When laying the laminate on your own, it is extremely important to lay the first row correctly and evenly. It is better to spend extra time on it than to correct blemishes or completely shift the laid floor. Otherwise, the installation should not cause problems. It is only necessary to insert the lamellas one by one at the intended place, latching the locks with pressure or a light blow of the hammer.
What kind of coating can laminate be laid on?

You can lay the laminate on any base: concrete, tile, linoleum, etc. The main thing is to prepare it, and if necessary, to strengthen it. If desired, you can even lay a new laminate on the old. Of course, provided that the previous coating was preserved in good condition.
Do not lay laminated panels on a wet or unpurified base. It is forbidden to use it in baths and saunas. If you choose a kitchen cover, make sure it is moisture resistant.
Laying on concrete floor

The condition of the concrete base determines how successful the installation will be. It should be:
- smooth, without bumps. Permissible height difference - 2 mm per square meter. meter,
- moisture proof
- noise and heat insulated.
If the old floor was dismantled, most likely, the base needs to be leveled. It is usually enough to putty the pits or remove the protrusions. If this is not possible, you will have to lay a new screed.
A traditional screed is suitable - from concrete or cement. Lay 4-5 weeks: these coatings dry so much. To find out whether it is possible to start installing the laminate, lay a napkin on the surface. Cover it with tiles, and wait a day. The surface is ready if the cloth remains dry.

Bulk quick-hardening mixtures are a more modern option. Manufacturers claim that they dry in a few hours. However, we do not recommend rushing to lay panels. For complete drying should take 3-4 days.
When the base is leveled, you need to do waterproofing. The easiest way is to overlap an ordinary film and fix it with tape. The stores also have substrates specially created for heat, hydro and noise insulation.
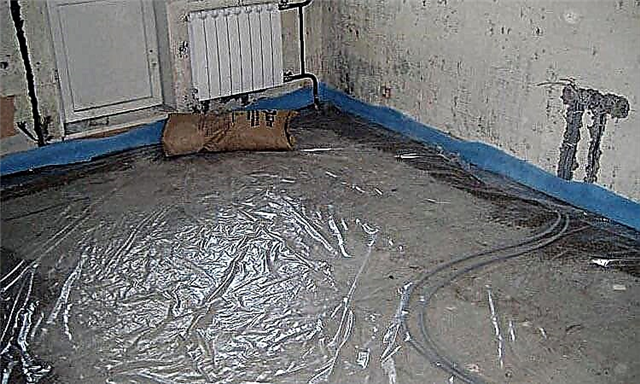
If you choose a four-layer laminate, you can do without waterproofing. Its last layer is made of water-impervious materials. However, we do not recommend this. It is better to play it safe, and lay the simplest substrate. So it will be more reliable.
Laying laminate flooring on a wooden floor

The lack of solid wood floor is creak. Over time, the nails that hold the boards loose. Therefore, before laying the laminate, you need to strengthen the base with screws.
First we consider how many screws are needed. To do this, find out the number of lags in the room. This is easy to determine: look at nails or crevices near the walls. Then - we count how many boards cover the floor in width. And finally, we multiply one number by another.
For example, there are 10 lags and 30 boards in the room. We multiply 10 by 30. It will take 300 screws and 20% in reserve.

Screws are hard to screw into a tree. It’s easier to drill holes 70% of their length, and only then - draw the boards to the logs. If there is a powerful screwdriver, drilling is not necessary. He will cope with the load. Make sure that the boards fit snugly against the lags, otherwise they will loosen when walking.
It is more convenient to level the floor with plywood. It is enough to put the material on the base, and screw it with the same screws in increments of 15 cm. Adjust the position of the plywood with a level, and do not forget to leave a gap of 10 mm near the wall.

The base is ready. You can start mounting the slats.
Laying on linoleum

Linoleum is a moody basis. If it is in good condition, it will serve as an insulating lining and provide additional sound insulation. If not, the floor is deformed, and the lamellas will bend. Therefore, before laying the laminate, check for linoleum defects.
The base material must be dry and clean. If there are holes, they are flush sealed with scraps of the same linoleum. See that the base is not decrepit. Otherwise, it will swell over time, and the lamellas will distort. To prevent this, use a substrate with a thickness of 3 mm or more.
An important parameter is humidity. Putting a laminate on damp linoleum is impossible. Check if the base is easy to lay. Lay out the polyethylene, crush it with hard objects. If no condensation has formed after two days (water droplets on the film), proceed with installation.

The substrate is required: it is it that will prevent mechanical damage. Take cork - it is elastic, and will keep the floor even even after serious physical influences.
Surface alignment
Professionals do not recommend laying a laminate on an uneven base for three reasons:
- the service life of this floor is less than a year,
- due to constant physical activity, the locks diverge - this will lead to the destruction of the entire coating,
- when walking the floor will creak.

To determine if there are bumps, use a level. Measure the deviation. If it is more than normal, you can correct the situation with the help of:
- substrates: if the height difference is less than 2 mm per square. meter,
- leveling the base: in other cases.
The easiest way to level the floor with a self-leveling mixture. Caution: this method is only suitable for concrete substrates. If the base is wooden, use plywood. We talked about how to use it in a separate section.
A set of tools for preparing a basic concrete coating with a self-leveling compound:
- a clean bucket
- putty knife,
- studded rubber roller,
- drill with a special nozzle designed for stirring. If there is a construction mixer - he will do,
- mixture.

First remove dirt, dust and debris from the base. Then - we part the mixture in a bucket. Manufacturers write on the packaging in what proportions to do it. Using a mixer (or drill), mix the contents of the container. We make sure that there are no lumps, and the consistency resembles sour cream.
Pour the mixture onto the floor. Important! You need to start from the highest point of the floor: then it is easier to achieve uniformity. We distribute the composition over the coating with a spatula. We carry out a roller in both directions: it will remove air bubbles. We wait until the mixture hardens.

Drying times are indicated on the packaging. However, manufacturers usually write a term through which you can walk on the cover without fear of harming it. We recommend adding a couple more days, and only then proceed with the installation of the laminate. This ensures that the floor lasts a long time.
Material calculation

To calculate how much laminate is required, you need to know the length and width of one plank. Typically, manufacturers write these characteristics on the packaging.
We show how to calculate the amount of material using an example. Let's say our room is 6 meters long and 4. wide. There is a small section facing the corridor. Its length is 1 meter, width is 40 cm. Then we consider this:
- the length of one bar is 0, 64 m: we took this data from the package. Divide the length of the room by the length of the lamella. It turns out like this: 6 / 0.64 = 9, 375. We round up to 10.
- similarly proceed with a width: 4 / 0.31 (lamella width) = 12.9. Round to 13.
- take into account the area connected to the corridor. We consider its length: 1 / 0.64 = 1.56. Width: 0.4 / 0.31 = 1.29.
- we consider how many lamellas are needed for the room - we multiply the two values obtained (10 * 13), and we get 130. We do the same with the adjacent section (2 * 2 = 4).
- add both numbers. As a result, we will see how many panels are needed to cover the room. 130 + 4 = 134.
- There are usually 8 boards in a pack, but it is better to check this information with the seller. To find out the number of packages, divide 134 by 8. We need 15.5 packages. For reliability, we take 16: this is definitely enough.
What else you need to know when calculating:
- around the perimeter you need to leave an indent of 1 cm: it is needed for depreciation,
- if you plan to install directly, you need a margin of 5-7%,
- if stacked at an angle, the margin will be 10-15%.
Tools

Before you lay the laminate with your own hands, stock up on everything you need. The minimum set includes:
- hammer / mallet: used to trim strips,
- durable iron tip tape measure
- Dummy: an ordinary wooden block is also suitable. Needed for a final knockout,
- stationery knife: optional, but it’s easier to cut the backing and open the packaging with it,
- wedges: help maintain the gap between the wall and the laminate sheet,
- jigsaw: for cutting slats. You can use a regular saw or even a hacksaw,
- metal bracket: for working with the last row,
- pencil with soft stylus.
Material laying
Before laying the laminate, let it rest at room temperature for 48 hours. This time is needed for acclimatization. Then - we begin to mount the lamellas.
The first row is laid from a long wall. You cannot knock on the boards so that they connect. Do this through the bar: then the panels will not be damaged. We cut the comb, the trimmed side is directed to the wall, but so that a gap of 10-15 mm remains. Caution: it should be smaller than the width of the baseboard. Spread the wedges in increments of 40 cm: they will not let go.
We collect the first row, we attach the second to it. So we act until we get an even coating over the entire floor area.


When we reach the last row, we measure how much free space is left. We file the lamellas so that they fit. Then - remove the spacers, set the skirting boards and sills. Done!
Near the pipes
Heating pipes or water pipes are near the walls: this greatly simplifies installation. First, we make a template on cardboard, mark a hole for a pipe on it, apply it to a difficult place. Correct so as to achieve pairing. Do not forget to leave a gap of 2-3 mm so that the laminate can "walk" with temperature differences.
We transfer the template to the laminated panel. Cut the hole with a jigsaw, round it with a file. We lay the board as usual, close the gap with a decorative overlay. Done!
If the pipes are far away from the wall, it is more convenient to use another method. We cut the panel with the holes across so that the pipes are exactly in the middle. We fasten the two halves together with building glue. The algorithm can be seen in the diagram below.

In the doorway

For the door to close unobstructed, it is necessary that the distance between it and the surface of the laminate be at least 3 mm. It is better to find out before starting the installation. Add the thickness of the substrate and the laminated panel, and subtract the resulting number from the distance between the door and the base of the floor. Less than 3 mm left? Then choose one of two ways to solve the problem:
- trim the door. The door leaf is removed and trimmed so that the panel fits. Be careful: keep the dimensions. If you remove the excess, there will be no chance to improve,
- trim the laminate. The lamella is cut so that it does not come into contact with the doorway, and a margin of 5 mm is preserved near the walls. It is simpler, but the result is less aesthetic.
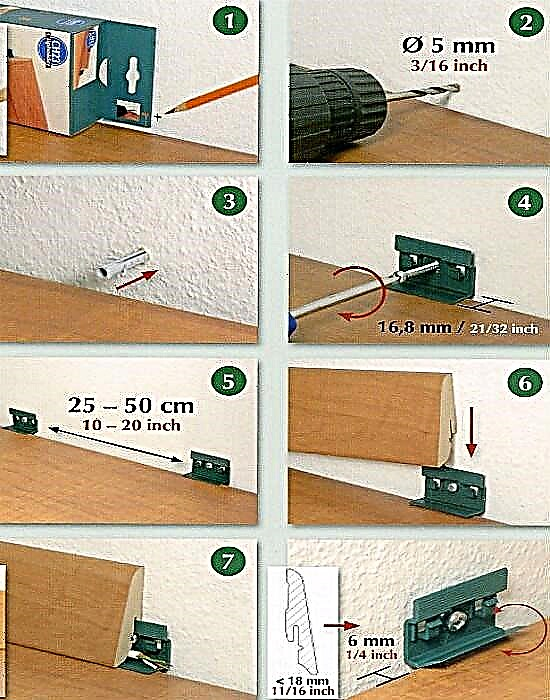
Plinth Installation
The baseboard is installed at the final stage of decoration. Before installation, it must be cut at an angle of 90 °: this will ensure the strength of the joints. You do not need to adjust all the trims immediately: it is better to do this during fastening. When one element is fixed, the next one is joined with it, and only then it is attached.
It is impossible to fix the baseboard to the laminate itself. It is fixed to the wall. How to fix the profile depends on what material it is made of. If you choose a laminated version from MDF, look at the back side - there should be a groove. A special clip is attached to the wall, the profile itself sits on it. Joints are coated with glue. Be careful: if you try to fix the baseboard several times without success, the grooves will loosen.
For work in corners the miter box is used. The profile is inserted by the side closest to the user, and the edge is located at the bottom of the tool. Then the baguette is cut at an angle of 45 °. Hold the plinth firmly during cutting, otherwise the seam will be uneven, and during the joining, a gap will appear that cannot be sealed.

Before attaching the corner, check that the elements fit snugly. If everything is done correctly, there will be no gaps.